Thomas Edison and Kindergartners

They are more alike than you might think at first glance!

According to the Edison Innovation Foundation, Thomas Edison once said:

“I find out what the world needs. Then I go ahead and try to invent it.”

Given the chance, any kindergartener would say that! Ok, perhaps they wouldn’t say “what the world needs” but they surely would say “what I need” or “what my friends need” or “what my dog needs.” They are natural problem-finders, and problem-solvers!

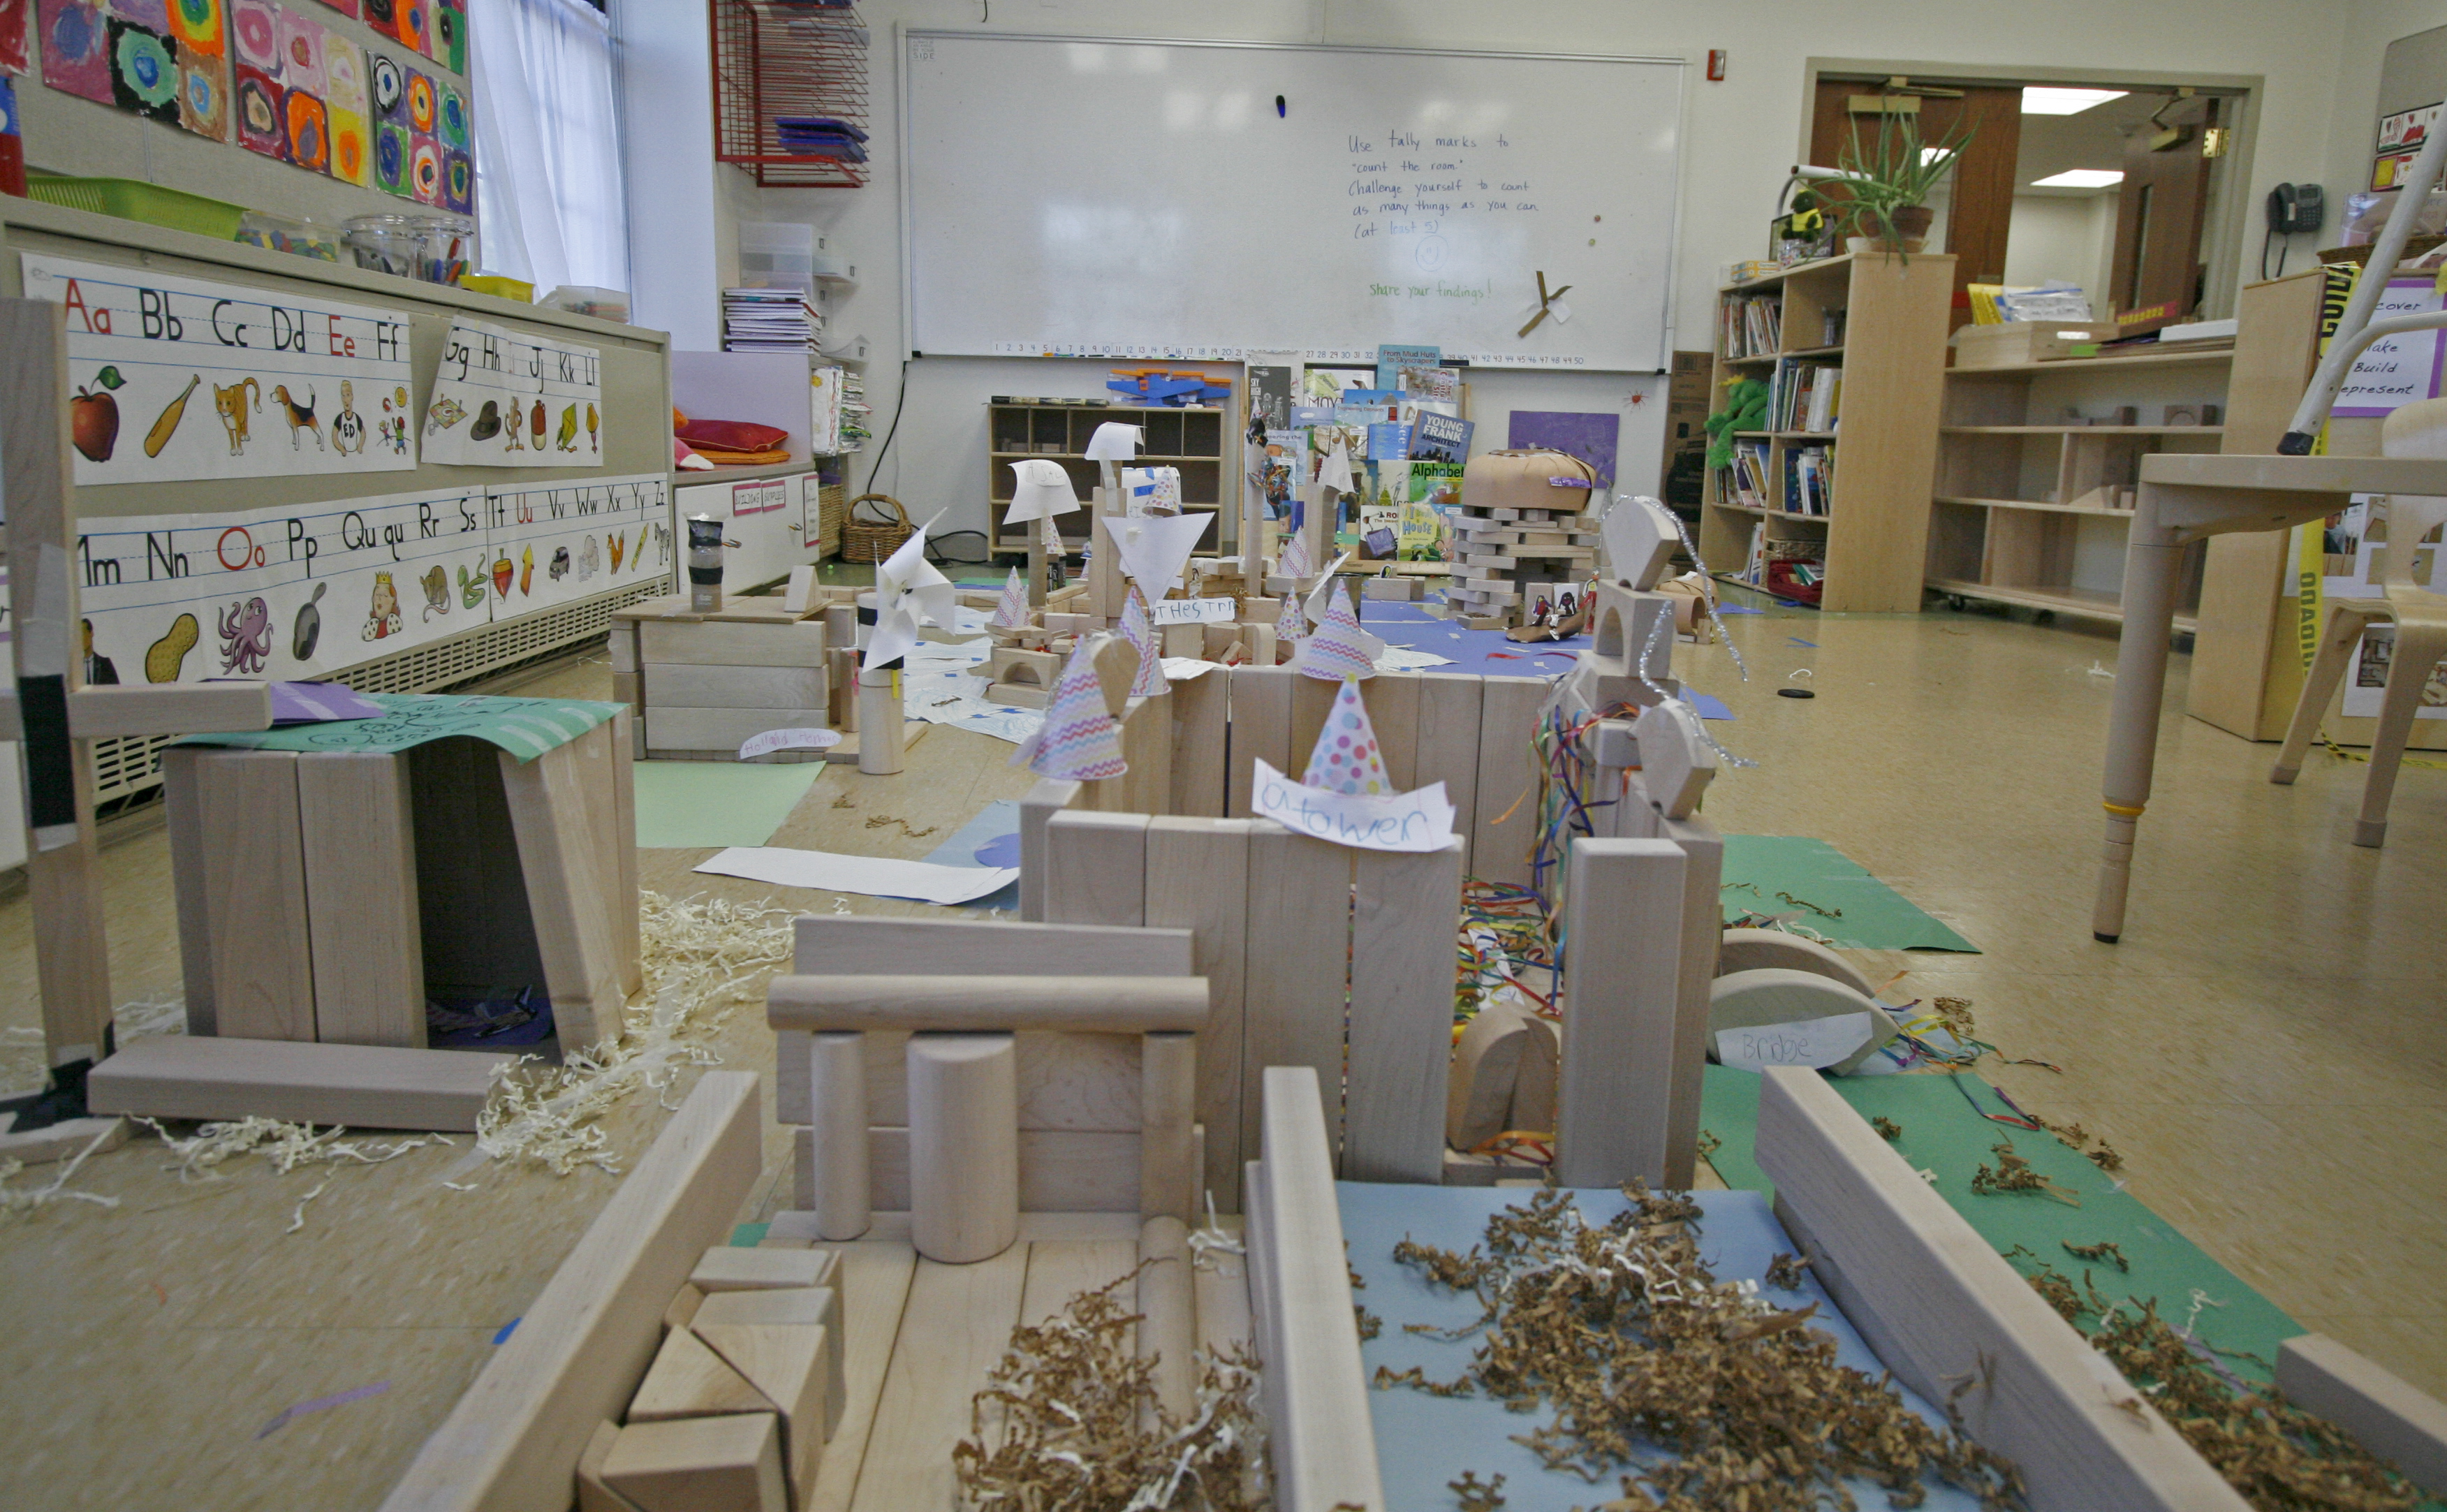
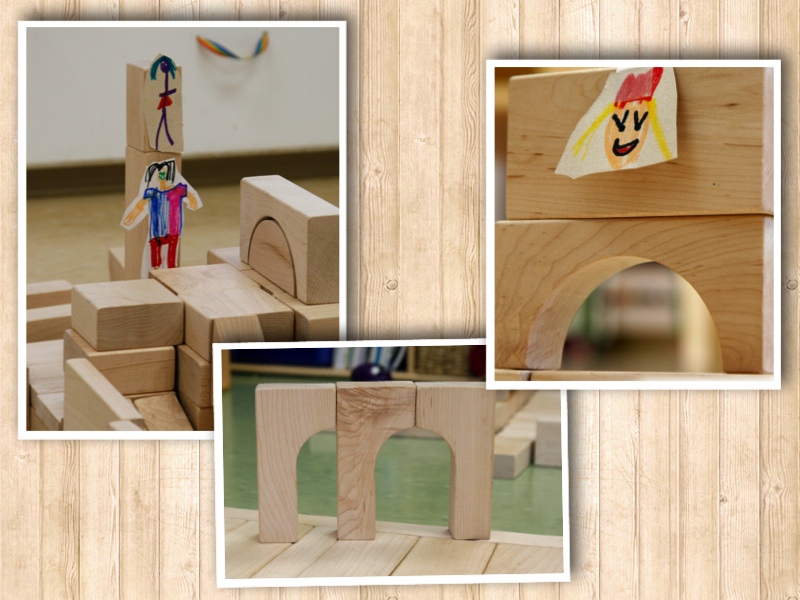
Like Edison, they are constantly observing, investigating, wondering, and asking questions. This, coupled with their imagination, and a rather intense desire to have things that do not yet exist, often leads them to a plethora of problem-finding. This car I just made is too long. We need a zip-line on the playground. Why don’t we have a container that holds all that stuff?

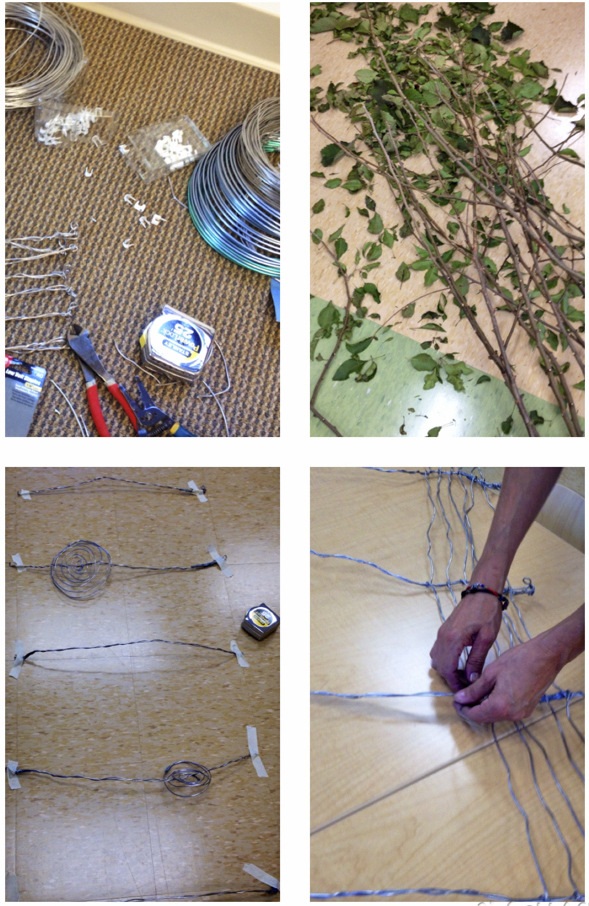
They often also share Edison’s intense confidence, boundless energy, imagination, and love of tinkering. Given the opportunity, time, resources, and a little encouragement, they create many prototypes as they engage in focused and determined problem-solving.

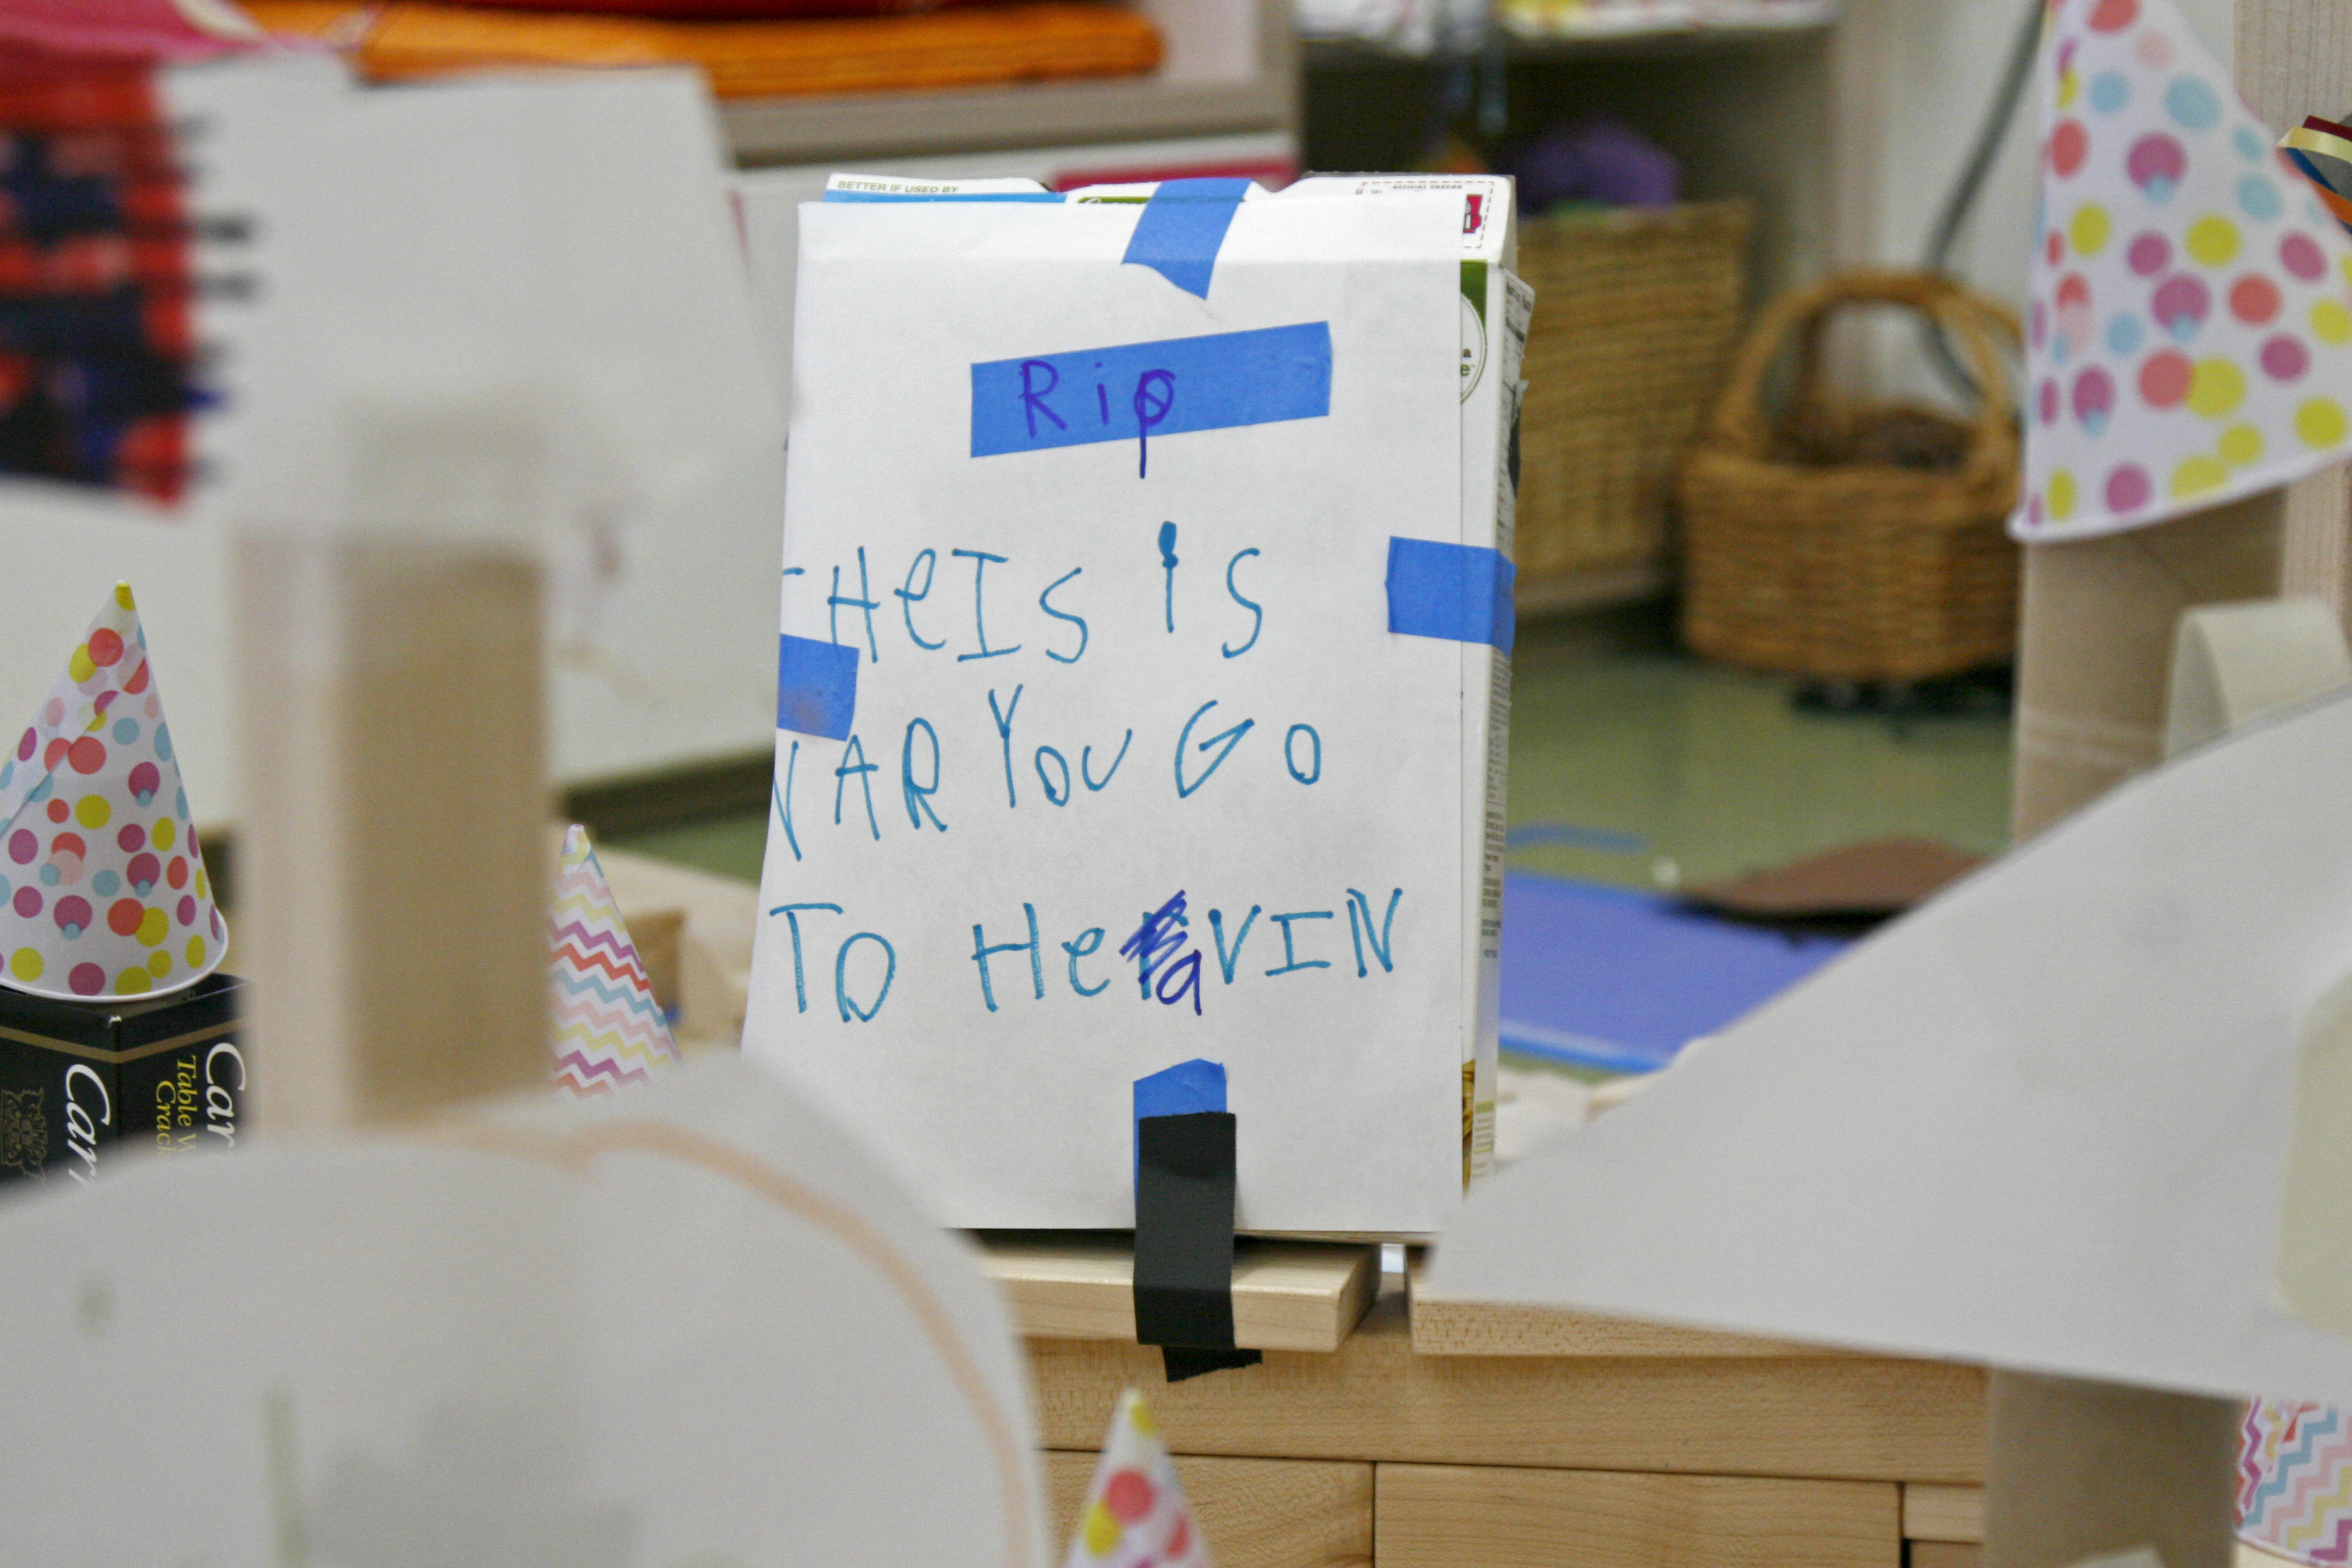
One of my kindergarteners recently discovered a problem she deemed worthy of her thought, time and energy. “How can you open a card without touching it?” Hmmmm …
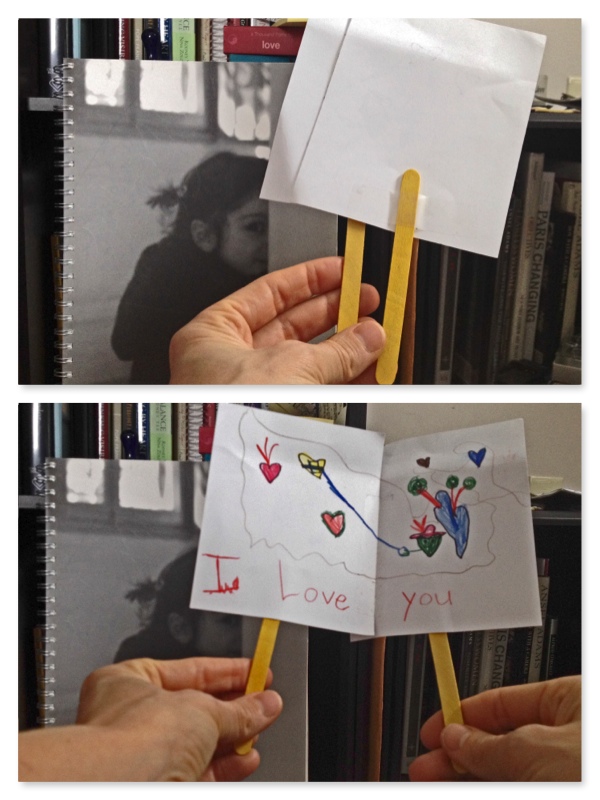
card collage

“Add some handles!”

We might be inclined to relegate this to the “ah, isn’t that cute” category. While it is cute, it is so much more! It is sophisticated problem-finding and problem-solving. This student took her present knowledge – about cards, sticks, handles, tape, hands – and thought about it in a new way. She used that knowledge to envision something as yet non-existent – a card you can open without touching it. She then took the materials available to her, and used them in novel ways to solve her problem. She created a card with handles. And, it can even be place in an envelope.

Finding problems, thinking divergently as well as convergently, tinkering, testing, and finally, problem-solving are important skills and habits. My fingers are crossed that my students will continue in this way, and one day say, with Thomas Edison “We found out what the world needed, and we went ahead and invented it!”

Resources:

Edison Innovation Foundation http://www.thomasedison.org/

Gustav Klimt and Kindergartners

Gustav Klimt is a favorite artist of mine. I enjoy finding ways to share his work with my students. Take a look at this work of his.

klimt-stoclet-fries-die-erfuellung.thumb.333x0x0x0x100x0x0x0

It is beautiful! Clearly it’s a masterpiece, and yet in many ways it is a work accessible to my kindergarten students. It is a combination of shapes – both in the detail and the figures.

I always have the girls work on a mixed media project when we are inspired by Klimt. I find it helps them express the detail he expresses when they have many mediums with which to work. Plus, it allows them to explore various mediums at the same time.

Typically, I bring in some of my art materials to share with them. They love the chance to use “real art mediums and tools” and treat all my things with the utmost respect. I love that my sharing expresses my respect for them as people and artists, and, hopefully, encourages them to be generous with the things they value.

This year I introduced them to Klimt while we were exploring shapes in math. I showed them full pieces, but spent most of the time drawing their eyes to the details and shapes found throughout his work. The girls enjoyed finding spirals, circles, squares, triangles, diamonds, rectangles and the many combinations of shapes Klimt created.

I decided to have the girls work on a trio of small art-pieces instead of one large piece. I hoped it might help them be more able to fill the paper with shapes. While I love having them work on large canvases, sometimes the size overwhelms them. We worked on 3×5 inch pieces of multi-media paper. When the girls were finished I mounted their work on a black background to create a triptych.

It was fabulous to sit and work with them. We shared pencils, artist markers, sharpie markers, a travel water color set, gel pens, crayons, pastels and security envelopes (fabulous idea I learned from Dar Hosta and Deb Barends).

“Oooh, I like that!” “Can I try that?” “How did you do that?” “Oh I never thought of that!” flowed across the tables as we admired each other’s work, and were inspired to give the new ideas a try. While they sometimes need a reminder, they are learning to see “copying” their ideas as a compliment rather than a transgression. I encourage those who “copy” to truly be inspired, and to make subtle, or large, changes in order to make the work their own.

I was, as always, impressed by their process and product. They have great, big, beautiful hearts and often it seems that beauty just flows out onto the paper. We learn from each other to be free with our work, loving the process and each other.

While I was working on a piece, one of the girls asked if I would like her to help me. “Sure!” I said, although I wasn’t sure what might be created. Her additions to the piece were wonderful, and made the piece much more beautiful than if I had done it alone!

I’m not sure anyone would realize we were inspired by Klimt, but we were, and we too created beautiful works of art. Here are a few from six of my students. Enjoy and be inspired!

girlsklimts

Resources:

Klimt Museum http://www.klimt.com

Great conversations

Our Thanksgiving Social Studies unit included a huge block build.We divided ourselves into three groups – those who remained in England and Holland, the Pilgrims/Saints who chose to leave on the Mayflower, and the Native Americans who were here when the Pilgrims/Saints arrived.

There were definitely times I wondered what I was thinking when I decided to work on this project. Many days I wondered how I would ever survive the energy, non-stop conversation, inquiry, work, and overall “mess” of the build. But survive it I did! And, wow, what a spectacular experience it was! My only regret is that I didn’t have a tape recorder running at all times. The conversations, questions, problem finding, problem solving, collaboration, joy, struggle, teamwork, negotiation, and creativity were remarkable.

We read books, watched youtube videos, and talked – a lot! The girls made sketches, as well as lists of things they wanted to include in each area. Then, unable to contain them any longer, the build began!

They were relentless in their work. The energy they brought to it was amazing. We usually worked in 30-60 minute increments, but often they wanted to spend more time, and continued to work during choice-time.

Here are some photos of the final product. They do not do justice to the incredible thought, work, and attention to detail the girls engaged in each day, but they will give you a sense of what was accomplished.

An overhead shot. England and Holland are to your right and include a castle, two homes and three windmills. The Mayflower sits in the ocean at center. The Native Americas are to your left and include a river (with a waterfall), a garden, round house and two long houses. 
_MG_4815Looking towards the Native American build from with the castle.

_MG_4813

 Looking at the Native American build from within the Mayflower.

_MG_4722

Looking toward the Mayflower from within the Native American build.

_MG_4730

The build was filled with problem finding and problem solving. How do we create a rounded structure from rectangular blocks? How do we make windmills? How do we create waterfalls? How do we represent fish in the ocean or rivers? What do squash look like? How can we create them for the garden? What do we do when our people don’t fit into our house? How do we negotiate when our neighbors want to add more ocean, or more land, or a larger river, and it crosses the line into our area? What do we do when our ideas are different than others in our group? And perhaps most thought-provoking – Where do we put the dead people?

The discussion regarding the dead people arose days after learning some perished on the ocean journey. Their discussion was practical: “Nope we do not want to store the dead people where we will be sleeping.” and “Maybe we can just throw them in the ocean.” But it was also filled with kindness and empathy: “Throwing them into the ocean wouldn’t be very nice.” They arrived at their solution after several extended discussions with each other and me. I didn’t offer solutions. I simply encouraged them to keep thinking, talking and problem solving. Eventually they decided the cereal box from our re-usable supplies would work perfectly.

_MG_4624

They didn’t only think about death. They also imagined people living – and giving birth! Directly in front of the “going to heaven box” they placed this woman – with her three babies!

_MG_4856

They treated the living with the same thoughtfulness they afforded the dead. “Did they have toys, Miss James?” “Did they have dolls?” After discussions about themselves and their parents, we decided they must have had some things to keep the children happy and entertained. They painstakingly created these cardboard dolls.

_MG_4725

They worked for nearly a month. When it was time to end the build, they resisted the notion of finishing and dismantling their work. “We aren’t done!” they insisted. I assured them their work had been thorough and fabulous. I explained we would do future builds – both exploratory and representational. Then I invited others in to see the build. The girls shared their work and their thinking as they gave the visitors tours of the build.

Finally it was time to clean up. It was a massive undertaking. But, it was a great part of the process. We had worked together to create the build, and now we worked together to “destroy” it.

_MG_4929

Eventually each block was sorted and stored, every piece of tape removed from the floor, each scrap of paper swept and recycled, and each handmade treasure safely stored in a girl’s bag. The canvas is clean, ready for our next creative learning experience! My fingers are crossed we will all be able to lean into the unknown, and experience another incredible build together.

Thinking, photographing, and conversing in the block center

Blocks are a fascinating medium. They provide endless opportunities for exploration, learning, growth and joy. While they have always been a part of our Kindergarten classroom, this year they are an integral part of our curriculum.

Blocks enable the girls to participate in all three domains of learning – cognitive, affective and physical/kinesthetic. The girls engage in mapping and spatial planning, collaborate with each other as they build, negotiate for space and use of blocks, and finally, when finished, conduct tours, as well as answer questions regarding their designs and buildings. The depth of thought and engagement is fantastic!

While building, the girls must think creatively and critically. What will they build? Where will they build? How will they create the various shapes and levels? What if the blocks they want are being used elsewhere, can they create that same block using other blocks? What if their structure is unstable and falls down, how can they re-engineer it for greater stability? Additionally, creative and critical thinking abounds as they furnish their buildings with accessories and special features, and as they create the community of persons who live in, or work in, their buildings.

My absolute favorite part of the process is documenting their work through photographs, and conversing with the girls regarding what I see.

It is incredible what I see, and don’t see, as I look through the camera. And it is fascinating and fabulous what I learn – about the girls, and their buildings – as I ask questions.

  • Can you tell me about your thinking?
  • What is this?
  • How does this work?
  • How did you make that? Is there any other way you could build that?
  • Tell me about this.
  • Hmmm. Could you create a way for …?
  • Why do you think …?
  • Oh wow! How did you decide to do that? How did you decide to do it that way?

Look …

blocks for blog2

Do you notice the two people? The builder was hesitant to add people to her structure – although it had a multitude of spaces where people would congregate, play, and live. Finally after a bit of conversation, she added the larger figure. I admired the figure, listened to her explanation, and continued to photograph the other girls. When I looked back, I noticed she had added another person … on top of the first person’s head! I chuckled and said, “Is she standing on his head?” She looked at me as though I knew absolutely nothing and said “No, Miss James, he’s giving her a piggy back ride!” I responded, “OH MY GOSH! Of COURSE!!!! I get it now.” How else would we show that? She continued creating people – some standing on their heads, some on their feet, and stacked them 10 high on the original person’s head. Evidently, the circus was in town and the acrobats were staying at that apartment building!

Now, do you notice the face with blond hair and a crown? The girl added that to her castle when we were talking about adding people. Hmmm, I thought, I wonder what that is? So, I asked. “Hey, A. What is that? A ghost? A head with no body?” As with the other girl, she looked at me like I was a bit silly, chuckled and said, “No, Miss James, it’s the old queen.” I didn’t get it yet. “The old queen?” She continued her explanation, “Yes, a picture of the old queen, on the wall! Look here is one of the old king!” I laughed and said, “Oh! I love it! Pictures of the people who used to be here. Fantastic! Does someone live in the castle now? Will you be adding them to the castle?” She assured me that she would.

Finally, do you notice the doorway (archway) that appears to have two entrances? I loved it as a structure and architectural detail but I was intrigued to know what the girl was thinking when she created it. “M. would you tell me about this?” She launched into a detailed description – complete with a demonstration – regarding the planning, purpose and use of the doors. Evidently there are good and evil people in her realm – of varying sizes. The good people, big and small, can enter the castle using the appropriate opening. But, should an evil person approach the doorway, the single arch magically moves to block their entrance. And, I believe, should they have somehow made it past that safety measure, there was a trap door waiting for them upon entering!

Fabulous, isn’t it? Their ability to imagine is quite remarkable, eye-opening and entertaining. But, had I not engaged them in conversation with open ended questions, I would not have understood the depth of their thinking!

Squish-squash books in Kindergarten

The other day I taught my kindergarteners how to make a squish-squash book (Special thanks to Dar Hosta for the cool name! https://www.youtube.com/watch?v=Z88mmn_P1Gk).

We worked together (teachers and students) each step of the way. Fold the paper the long way – don’t forget to match the corners, hold the edge tight and make a nice, hard crease. Open the paper. Fold it the short way. Now fold the top paper down to the middle fold. Flip it over like a pancake. Fold the other side down. Now you have an M or a W – depending how you hold it. Hold it so it looks like a W. Now cut the center of the W down to the fold at the bottom of the W. Grasp the top fold on each side of the cut – squish, squash!

squish squash fold

LOL yes, yes, it sounds rather complicated when you just read the words. Perhaps you are wondering – “How on earth did those kindergarteners do that?” Well, let me tell you, with a bit of direction, some encouragement, and a whole lot of respect for them, and their abilities, they did fantabulously!!! (Yes, fantabulously – better than fantastic, better than fabulous … fantabulous! How’s that for creative manipulation of the English language?! My students love the word, by the way.)

The most amazing thing was the response of the students. They were making books and talking with anyone who would listen! They were excited, empowered … giddy even! Some filled each page with illustrations. Some filled the pages with words. Others made many different sized squish-squash books, and gleefully taped them together!

squish squash

Why was this such a powerful experience for the students?

Was it the power they felt as they made their own book-form? Was it the freedom to do what they wanted? (Write, draw, make more books.) Was it the respect of the teachers for the students? Was it the authenticity of the activity? Was it the joy the teachers shared with the students? Was it the fantabulousness of the students themselves?

To be honest, I’m not sure I can pinpoint one thing that made this activity great. I think it was a combination of all of the above – and more – coming together in a beautiful, synergistic dance. And wow, was it great to experience. Fingers are crossed we will experience it over and over again throughout the year!

A Tree Grows in Kindergarten

I recently attended a workshop at Bank Street College in NYC. They have a tree growing in the middle of their lobby! A BIG TREE! If I remember correctly, it actually goes up to the second floor.

It was fabulous! I wanted one in my space. It would add to the classroom environment. It holds incredible possibilities for all sorts of learning and playing – science, history, literacy, math, art, morning meetings under the tree, and puppet shows in front of the tree. And, the students would love it.

I chuckled as I wondered how I might convince my school to architecturally recreate the kindergarten and library (above our room) to allow a tree to grow within the school building. Realizing that was not likely to happen, I set about thinking how else we might have “a tree grow in kindergarten.”

Ages ago, a friend gave me all sorts of wire to use as sculpting material. I still had a lot of the wire left, in a beautiful basket, on top of my cabinets, waiting. “Woo hoo” for keeping things that have creative potential, even when I can’t figure out how to use that potential.

That wire held the answer! If I couldn’t grow a tree, surely I could make one out of wire!

In my mind, I imagined a grand tree. A wire trunk with real tree branches  “growing” out of the wire trunk. It would be spectacular!

I built the tree in my mind several times – often changing the structure on a long car rides. Finally, I was ready to give it a go.

There was a lot of prep work the night before the build – find fishing wire, fight off mosquitos to get branches, take the leaves off the branches, gather tools (wire cutters, clippers, pliers, a hammer, pencils and a tape measure), load the car, and, perhaps most importantly, try not to forget anything.

The day of the build also held a lot of work – including tons of measuring and re-measuring, a failed try at anchoring (which, thankfully, led to a better engineered tree), an incredible amount of wire work, the realization I had to cover the pointy wire ends (yay for silver duct tape), and many other niggly details and tasks.

tree collage

The process was an interesting combination of frustration, invigoration, exhaustion, perseverance and psych. It was an exercise in patience as I pro-typed, failed, thought, re-thought, tried again, looked, looked from another angle and perspective, adjusted, tweaked and took untold number of relaxing breaths. In the end, my fingertips and back were screaming, but the tree was there, “growing in our kindergarten room.”

I will, no doubt, rebuild it again in my mind. I am already imagining new ways to connect and support the branches to allow for greater artistry and larger branches! But for now, a tree, made of wire, paper, actual tree branches, hard work, and imagination, grows in Kindergarten .

(A close up of the wire bark – complete with knots.)

tree2

 (The tree ready for our first day.)

tree1

I trust the tree will bring joy to those who experience it, and encourage them to be open to possibility, creativity, imagination, hard work,

I hope, now, and throughout their life, they will be inspired, and empowered, to create something new and fabulous — perhaps, something incredibly useful and valuable.


Bubbles Art, Science, Math and Language Arts!

The wider the range of possibilities we offer children, the more intense will be their motivations and the richer their experiences. We must widen the range of topics and goals, the types of situations we offer and their degree of structure, the kinds and combinations of resources and materials, and the possible interactions with things, peers, and adults. ~Loris Malaguzzi, Hundred Languages of Children

OLYMPUS DIGITAL CAMERA

Bubbles are fascinating and afforded us several challenging and fun ways to explore and experience science, art, math, and language arts. There was a plethora of things to notice, marvel at, wonder about, investigate and enjoy!

… The variety of sizes. The delicate and yet strong nature of soap film walls. The colors and reflections that are captured in the bubbles. The many things that can be used as a bubble wand. Do heart-shaped wands make heart-shaped bubbles? The ways we feel when we blow bubbles. Should we blow slowly or quickly? Does that make a difference? Can we fill the room with bubbles if we use a window fan? The joy and sorrow felt as bubbles pop. The way the wind takes the bubbles as they leave the wand. The way the bubble solution feels, and sometimes tastes, as the bubbles pop close to our lips. Can we create bubbles from things other than store-bought bubble solution? How could we create bubbles in art? What colors are bubbles? Which words best describe bubbles and our experience? 

Prior to starting I told the girls we would be scientists, authors, readers and artists, and that the process would take us several days. We experienced bubbles through our eyes, our ears, our brains and our bodies!

  • We did several read alouds.
  • I blew bubbles and the girls experienced them only with their eyes. What did the bubbles look like? How did they move?
  • They blew bubbles. Again, as scientists they tried to observe things about the bubbles, the process and each other.
  • We all blew bubbles, and just experienced the joy of bubbles – much laughing, movement and even some screaming!
  • We created bubble wands using various materials: pipe cleaners, plastic plant mesh, plastic water bottles, straws and string. We tested and observed each – Was it easy to make bubbles with them? Did they make big bubbles? Small bubbles? What shape were the bubbles? Did the bubbles mirror the shape of the wand?
  • After each experience the girls shared words and feelings, which I scribed onto a large piece of chart paper.
  • We ended up with three lists of words. We observed the lists: How many are in each? Which list has the most words? Which the fewest? Why? (We noticed that the words increased as we engaged more fully in each experience and grew in comfort with the process.) We used math strategies to add the lists together and come up with the grand total. We marveled at our abilities to describe our experiences. We used these lists to create our list poems.

OLYMPUS DIGITAL CAMERA

I brainstormed many ways to create a frame for the list poems and finally decided (for ease and aesthetic reasons) to cut a frame to place over the girls paper as they stamped. The frame allowed them to stamp freely while maintaining a clear border for their list poem. I held the frame in place, as the girls used the cardboard tubes and ink pads to create their bubbles.

I was amazed and impressed with the thoughtfulness with which they approached their work. Each girl had her own particular process, but each was purposeful in her choice of tubes (various diameters) and placement of bubbles. My only instructions were to be sure to press straight down so as to get a good print (and not to fret if it was less than perfect, as that added to the uniqueness of each piece) to consider overlapping the bubbles at least a bit, and to not be afraid to overlap the frame.

OLYMPUS DIGITAL CAMERA

I brought in some artist quality pencils to share with the girls. I talked about why I liked the pencils – great colors, nice feel in my hand, beautiful movement across the paper – and why I chose to share them with the girls – they are artists too and I thought they would enjoy using them. I asked them to take care of the pencils as they were special to me. The girls were fantastic with the pencils! They carefully chose the colors, replaced them in rainbow order, only sharpened them as much as necessary, shared them with each other, and really seemed to empowered by using them. (We ended up using them in free choice as well as other projects.)

After the ink dried, the girls worked diligently to fill in each full shape (not the partial bubbles around the edges). We discovered that the ink, though dry, sometimes transferred around the paper, so we used a paper towel to minimize movement. Thankfully any transferred ink erased easily.

bubble words

Once finished with their art piece, the girls moved on to their list poems. The goal was to create a list poem and encircle the bubbles with the poem. (We read, observed and discussed poems from Falling Down the Page by Georgia Heard prior to this project, and emulated the freedom Georgia showed in placing words on the page.) Each girl began by choosing 12 words from the class lists and writing them in the frame of her paper. If needed, she chose more words.

When everyone was finished – and it took some girls many days to do so – we shared our poems and art pieces with each other. Finally, we displayed them on the hall bulletin board, with black and white photos of each of us blowing bubbles as the border.

RESOURCES:

Sewing, thinking, and creating with Faith Ringgold

Tar Beach is, in my opinion, both simple and profound. it is easy to understand and yet filled with illustrations and ideas that inspire both wonder and discussion. It is an excellent platform from which to explore a female artist/author, and to integrate arts and creativity into the curriculum.

We did an interactive read aloud of the book – actually reading it two or three times at different points along the process of the project. We watched videos of Faith talking about her writing and art – especially her story quilts. We examined pictures of the quilts and noticed that the stories were told in word and illustration. We inquired about, reflected on, and discussed many things.

Why is the book called Tar Beach? What is the tar beach? Have you ever been to a tar beach? Do you think it would be fun? Why or why not? Can someone really fly over the city like Cassie? Do stars come lift you up so you can fly? What could Faith Ringgold possibly mean? Why does Cassie fly where she flies in the story? Have you ever wanted to belong to a club but couldn’t? Have you ever wanted to do something to help others feel better? Have you ever wanted to do something to help your parents feel better? What are your dreams? Where would you go if you could go anywhere?

The discussion was rich, and continued as the girls worked on the art/literacy project.

I combined ideas I found on the web (see resources) with my own ideas to create a project that involved drawing and a certain sense of mapping – choosing and implementing the body position of their flying person, as well as placement of their person on the paper, color mixing, painting, small motor skills (cutting, gluing), sewing, imagining and writing.

The project was not simple. It took a bit of prep on my part and a good bit of stamina and work by the girls. We worked together on this project for several days.

  • I measured the paper and cut many sheets of paper. We needed a background, a piece for the sky, a piece for them to draw themselves flying, a piece for them to write their dreams, and squares to glue around the edge for the quilted part.
  • The girls brainstormed how they might look if they were flying. Once the had an idea they liked, they set to creating it in pencil. Happy with their work, they went over the lines with sharpie markers. (There is something striking about children’s work in black sharpie.) Finally they added color to their person.
  • They pasted the square pieces – in the fashion of a quilt – along the edges of a 12 x 18 sheet of paper. By the way, it takes a LOT longer than you might imagine. I was impressed with the girls perseverance.
  • They created a night sky using various shades of blue and purple and filled the sky with glitter stars.
  • Once their sky painting dried they decided how they would fly and glued their person onto the sky.
  • They were very careful and deliberate with all their work!
  • Finally, after thinking deeply about where they would want to fly and why, they used their best spelling, and writing, to transcribe their thoughts onto the project.

faithringold2

At first I thought that would be the end of the project – glue all the things onto the background and display them. However, it seemed unfinished, and somehow disrespectful of the strength and capabilities of the girls, to have quilt pieces devoid of any sewing.

I was reminded of a quote by Jerome Bruner. After visiting some Reggio Emilia schools (they are early education classrooms, by the way), Jerome commented on the level of respect afforded the children by the educators. “It is like a seminar at the graduate department of the university, with the same kind of respect, of exchange in talking about what you have just said, and about your former thinking” (Rindaldi, p. 58). While the quote comments on thinking, I believe it can be expanded to include respect for the students’ work as well as their thinking.

I decided I would bring in my sewing machine and have the girls sew their art pieces with my machine. We talked about the fact that I, and many of the adults in their lives, sew on a machine. I explained the way the machine worked – in all its glory as well as it’s potential for harm. (No one wants a needle sewn through their finger!) I told the girls that I was confident in their ability (with my help) to use the machine and generate beautiful things. Then, we got to work.

faith ringold sophia

I sat behind them as they sewed. We had a dialogue regarding where and how they should sew. We talked about going fast or slow. We discussed hand positioning. We agreed that if I said “stop” they would immediately remove their foot from the pedal. They were fantastic! For a five year olds, there was quite a bit of sewing – and it was all straight lines so they had to work on keeping the paper at the proper guide. After a bit of time coaching each girl, I was pretty much a watchful spectator.

When we were all finished, I created a used their pieces to create a quilt on the hall bulletin board. It was awesome to notice all the older girls and teachers who stopped to examine, and marvel at, our words and artwork.

faithringold quilt

RESOURCES:

Inspiration for art project:

  1. http://weskart.blogspot.com/2010/12/faith-ringgold.html
  2. http://pinkandgreenmama.blogspot.com/2010/05/art-in-schools-faith-ringgold-paper.html#.U-FFXoBdUoo

Video:

  1. Making the quilt –  http://www.youtube.com/watch?v=794M-mcOJY4
  2. Writing Tar Beach –  http://www.youtube.com/watch?v=ZdPxHvGB1Xo

Faith Ringgold:

  1. http://www.faithringgold.com/
  2. http://faithringgold.blogspot.com/2007/03/faith-ringgold.html

Reggio Quote:

  1. Carlina Rinaldi, In Dialogue with Reggio Emilia: Listening, Researching and Learning. London: Routledge.