Expected, and Unexpected, Process and Product

“Would you come up with something creative we can do together at our next ELA meeting?” That simple question was the beginning of what would become, for me, a fabulous process and product!

It was a crazy time of year. We were all a bit stressed, with tons to do. “Perfect!” I thought. “Let’s take all that angst and struggle, and use it to make something beautiful!”

Our tools:

  1. sharpie markers (preferably black)
  2. old gift cards or credit cards
  3. acrylic paint
  4. canvas panel
  5. old magazines
  6. white glue
  7. bravery
  8. boldness
  9. openness
  10. joy

Our process:

  1. Think of all the things that are making us crazy, or cranky or stressed. As the end of the year approaches, that list can become very long. I encouraged myself, and my colleagues, to think of things from all areas of our lives.
  2. Write them down, in permanent, bold, black ink, all over the canvas. Be free! Write them one on top of the other. Make lists. Write big. Write small. Print. Write in cursive. Cross them out. Make them bold. Add lots of exclamation points. Curse if you like. LOL!
  3. Remember this is for you, no one else. No one gets to check it before you add the next step. No one sees it unless you choose to share. Be bold. Be brave. Be honest.
  4. When done, put the cap on the pen, and set it aside. Look at the canvas. Good? Anything else you want to write? Anything else you want to add? If so, pick up that pen again, and add it. If not, move on to number 5.
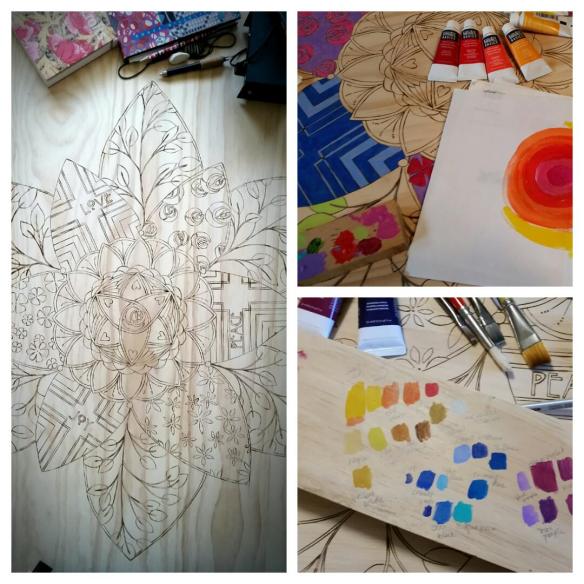
  5. Choose some colors. I like to be free, but mindful, in my color choices. Some colors become mud when blended. Sometimes muddy is good, but other times, not so much, hence the mindful part.
  6. Put  small dabs of the paints on a paper plate or tray.
  7. Using one of those old cards as a palette knife, pick up some of the paint and get it on the canvas. The card allows for a thick or thin paint application. Thick application can add texture or the possibility to completely obscure your words. Thin application allows for more layering of colors, and causes the texture of the canvas and the written word to be more prominent.
  8. Be free with the paint application. Don’t fret about mixing colors. Use only one card for the entire work. If you have too much paint on it, or want another color free from any other, grab a paper towel and wipe off the card. Experiment with thick or thin. (I like a thin application so the handwriting can be seen, but when it is your art, use your own preferences.)
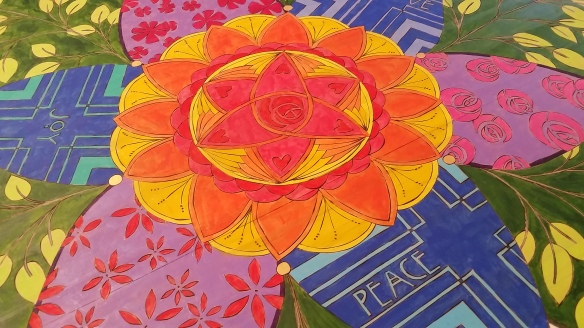
  9. Flip through the magazines to find words or images that are the opposite of the words you wrote on the canvas. Find ones that inspire you. Search for beauty, peace, breath, love, laughter, or whatever else makes you say, “Oh, this is good!”
  10. Tear them out of the magazine! Experiment with different angles, with how much space you leave around the words, and with tearing in different directions. You might be surprised with all the variations you can get.  (If you must, lol, you can cut them out. But, if you can live with the possibility of ripping something wanted, and the less than perfect edges of the tear, then please, tear them. I promise, the results can be beautiful, and meaningful.)
  11. Once your canvas has dried, place these images and words on the canvas. Explore varying layouts. When you find one you like, use the glue to make it permanent. Be aware, if you haven’t cleaned your hands you may end up with some unexpected color. Don’t worry if that happens, there is one more step!
  12. When the glue has dried, add one more layer. Find or make a stencil and use it. Add color with your fingers. Grab a stamp and see what you can do with it.

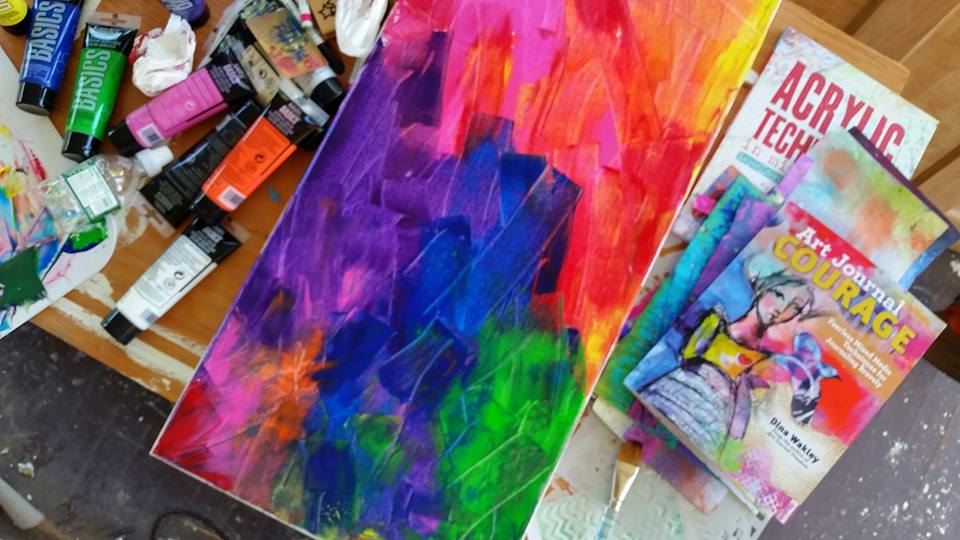
Here is my final product.

2016-04-04 19.09.34

Or so I thought!

This is my product, and I love it, but it turns out it was not my final product. There was more. There was the unexpected process and product, and it was fantabulous!

As I drove home, my thoughts returned to the meeting, my colleagues, our process, and our product.  So many thoughts, observations and wondering. And then, my thoughts turned to my product.

“I wonder if I can read what I wrote? Maybe if I look really closely?”

There was definitely part of me that wanted to read them again. Hold on to them. Feel them again. Experience their power. Another part of me speculated it might have been better to have completely concealed my words under a think coat of paint. I resisted any urge to pull over and examine my canvas, lol, and reminded myself that the point of the process – outside of pure creativity and joy – was to let things go!

When I got home I pulled my canvas out of my bag, and spent some time with it.

I liked it. It wasn’t perfect, but it was interesting. It wasn’t flawless, but it was beautiful. And those imperfections and flaws? They added to its interest.

I couldn’t read my words, but I could see my writing, and I loved that! The writing added depth and texture to the work.

Then I had an aha moment … my final product (at least for now).

The piece was just like my life. Multi-layered. Not perfect, but pretty fabulous. And those things that make me anxious, stressed or cranky? Endured, survived, embraced, laughed about, cranked about, talked about, prayed about, and released – even if they remain in some fashion – they make me better, more interesting, more awesome, more me.


Save

Save

Save

Save

Save

Save

Save

Advertisement

Engaging in the Hard, Fabulous Work of Creativity

My bathroom has two sliding doors. I designed the bathroom with these doors as canvases for some sort of artwork. Finally, one side of one of the doors is finished!!! Well, to be specific, the artwork is finished,but the door remains perched on two saw horses in my bedroom/studio, waiting for a few coats of polyurethane before it is hung again on its slider.

.door on saw horses

It is remarkable how much thought, research, doodling, re-thinking, kibitizing, talking, looking, and physical work, are involved in being creative! I love the process, but for some reason, this project really encouraged me to notice the time, effort, thought and work of creativity.

My process:

  1. I spent days thinking about the project. I imagined what I wanted. I thought about how I might achieve what I wanted. I changed my mind numerous times. I decided I wanted to — somehow — stay true to the architectural design of my arts and craft bungalow home.
  2. This sent me on a long path of research – looking up arts and craft fonts, flipping through a plethora of arts and craft design and art books, and googling various people and pieces I was particularly drawn towards.
  3. I found two fonts, and many designs I liked. Now I had to see if I could actually use them. Could I learn how to draw them and make them my own?
  4. Next came the doodling and sketching. Funny as it may sound, I experience joy when I find and use a pencil that feels good in my hand, moves smoothly across the paper, makes great marks and erases easily. And speaking of erasing, the number of iterations I went through in order to come up with the final design, was amazing! I wish I hadn’t thrown away all my sketches. It would be good for my students to see and know that the work that looks so easy, and causes them to say, “Wow, you are so good at that, Miss James!”  is actually informed and supported by many other tries! I’ll be sure to keep the next batch.
  5. My final design is the result of being open to possibilities wherever I found them, and mashing together ideas from many different arenas – arts and craft designs, zen-tangling sensibilities, yoga, mandalas, nature, botany, math, color theory, and I’m sure many more that I’m currently forgetting!

door collage

But that wasn’t the end! The work, thinking, experimenting, ideating and iterating continued.

  1. Now I had to take my idea  – drawn on an 8.5 x 11 piece of paper – and transpose it into something beautiful on the actual door. Rulers, yardsticks, lovely pencils and erasers, compasses, and scratch pieces of paper were purposefully strewn across the door. I measured, sketched, thought, looked, breathed …. and did it all again for some time. It was fabulous! Finally the design was sketched onto the door.
  2. Next was the wood-burning stage which would create the dark lines of the design on my door. I should mention that this stage was also preceded by many hours of practice. The burner comes with many different tips. I experimented with each one to see what type of line it created, which heat worked best for it, and how easily I could manipulate it to create the lines I wanted. I experimented on various types of wood – they all seem to burn differently – and then explored the different areas of the clear pine I was using. The grain caused different burning rates and necessitated changes in speed and heat.
  3. Finally, time for color! I loved the look of the design burned into the wood. I’m sure it would have been fine to polyurethane it in its natural form, but I had created it with color in my mind and knew it would seem unfinished if I left it uncolored. So, once again, I risked “wrecking it” in order to make it what I knew it could be.
    1. I laid the colors out on the design – playing with different combinations.
    2. I painted the colors onto a similar piece of wood. I was amazed by the difference in the colors out of the paint tube versus on the tube.
    3. I thought, looked and waited. Mostly the waiting was because I was working during the day and coaching in the evenings, leaving me little time to create. But, that waiting was important, because I had time to look, and look some more, and allow my brain to play with the colors.
    4. I couldn’t decide on all the color combinations so I started with one color combination – the leaves – and as I painted, the other colors combinations coalesced for me.

The color and painting process was fascinating! I tried to figure out the entire color scheme, but failed time and time again. When I stopped trying and began painting, I – for lack of a better phrase – began to see better. It was as though the process of immersing myself in the medium – the paint and the painting – increased my clarity.

I can’t explain it — many ways it was magical! As I painted the leaves, with the tubes of paint lying about me, and I would notice myself thinking “Oh! That might work.” I’d continue painting, and notice another thought “Hmm, perhaps that is too much. I think this might be better.”

Often I’d run my ideas past my brother (another creative, learned soul) for clarification and validation. I wouldn’t always use his ideas, but somehow his ideas fed mine and helped them become more “perfect.”

door closeup

Each step in the process involved risk, flow, joy, time and triumph. It was all fabulous, but the time was really important. Time to think, to do, to wonder, to mess up, to re-think, and to experience the process, the product, the materials. I would often just stand at my work – leaning on the door, examining it with my eyes. Other times, I would run my palm over the work. The tactile experience of touching my work in its various stages of completeness was incredibly important, necessary and satisfying.

It makes me think about school and my students. How can I help them have this experience of creativity — in all its angst, sweat and splendor? How can I give them the time and opportunity to experience — in their own creative work and thought — what I experienced in mine?

I’m not completely sure, but rest assured I’ll be thinking about it, and letting the question, and any possible answers, inform my teaching practice!


Courageous Creativity

math canvas 1

Sometimes we have to show a little courage in order to encourage it in our students!

Our math coordinator felt, I think, a little left out of my Kindergarten classroom. It is a lovely space, rich in the opportunity to do math, but not so rich in the “in your face, obvious, look this is math” kind of way! I love math, yes, for real, I really do. So I thought “Let’s go all out!”

I pulled out two canvases. They were beautiful! Big, thick, pristine, white canvases. I was excited to make some sort of creative, statement piece. Something that was fabulous artistically and aesthetically, and actually said something about math.

You may recall, I’m sometimes a bit of a chicken when it comes to the big, blank, white page! And, let me remind you, this was not a only big, blank and white, it was a canvas, and not a cheap one at that. But I had no time for timidity! I had two days to create two canvases. Eeek!

I flipped through a couple mixed media art books, and came upon many ideas I thought I could use – putting paint on the canvas with an old credit or gift card, creating layers with stencils and cut paper – and perhaps most importantly, not being afraid of the process.

A deadline is not always helpful when you are being creative, but this time, it was incredibly helpful. I didn’t have time to entertain my fear of the blank page, or the possibility of destroying the canvas. I had to trust the process, the colors and me, and just do it! So I did.

It was super fun and super freeing. Hopefully it will inspire parents and students to wonder, investigate, think, share, strategize, question, problem solve, reason, make mistakes, try again and learn … even if they are feeling a bit trepidatious!

math canvas 2


Hiking boot canvases

I found a pair of Asolo hiking boots. Loved the fit, but the color? Not so much … red. I was conflicted. A good feeling boot is hard to pass up, but whew, red? Definitely not my thing.

I walked around the store for a good long time trying to decide what I’d do. Then It hit me – tangle them! If that worked, they would rock! The black sharpie would soften the red, and the tangles would create a functional piece of art.

hiking shoes 1

It worked! (Don’t you think?) Turns out they were a fantastic canvas for tangling.

hiking shoes 2 Now I can’t imagine hiking in anything else.

I am the rockin’, creative, hiking girl in the fabulous, one-of-a kind boots.