Oooh, A New Brush!

I broke out a new watercolor brush today. It was so much fun! If you’ve never tried it, you really should. It doesn’t have to be a new brush — any new tool will do. It’s especially fantabulous if the new tool has unique or unusual characteristics compared to your other tools.

I discovered this type brush a few months ago. Can you imagine?! I’ve been an artist of sorts my whole life, and here’s a brush I’d never heard of before.

The brush is a rigger, and the hair is remarkably long compared to a similarly sized round brush.

I read it’s called a rigger because it was originally used to create the straight lines of the rigging of boats. The idea being, I believe, that the long hairs allowed for the shaking in your hands to be less noticeable in the line. And yet, what I loved as I used it, was the fact that very slight movements of my fingers/hands created beautiful, non-straight, organic lines. I’m thinking there’s a connection between those two competing uses. I can’t yet express it, but I feel it’s there. I need to play a bit more.

Finished for the moment, I imagined my Kindergartners saying, “That’s so nice, Miss James. How did you do that?” Implying “How can you do that but I can’t?” I usually respond to that query by reminding them how long I’ve been playing and practicing. But today, I’d have to add, “And I used a really cool brush called a rigger. I’ll have to bring it in so you can try it”

Advertisement

Hardware and Tools in Kindergarten

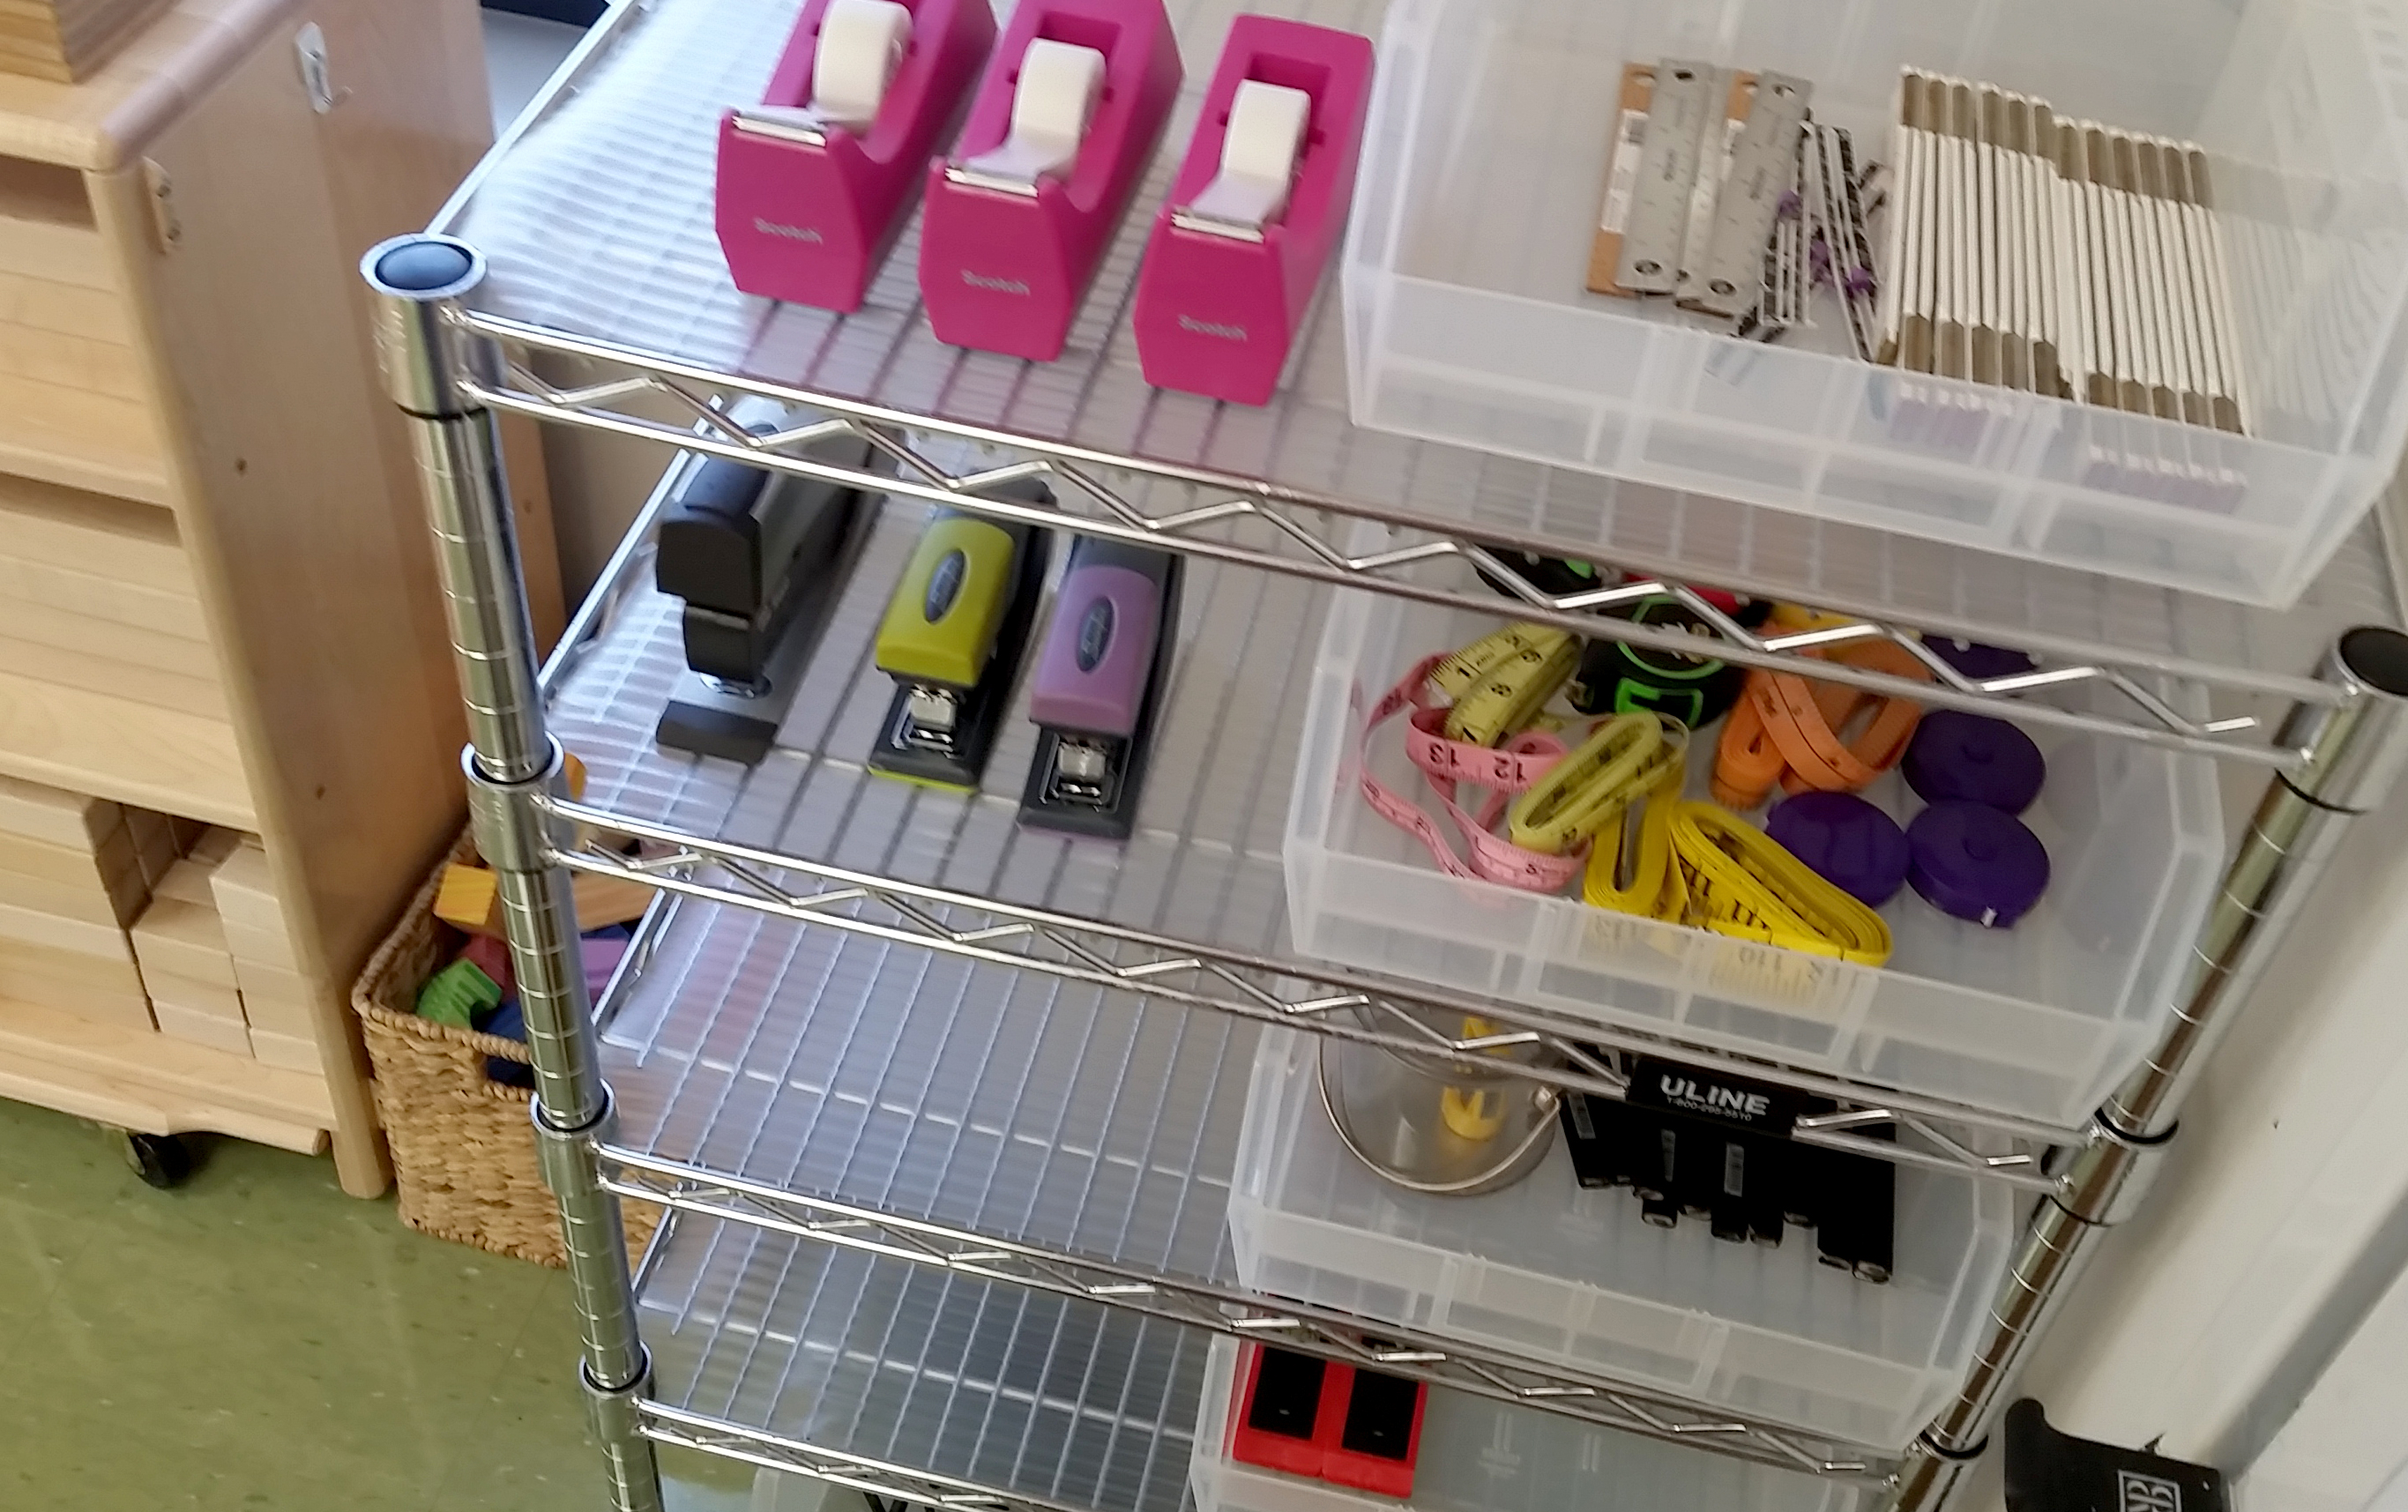
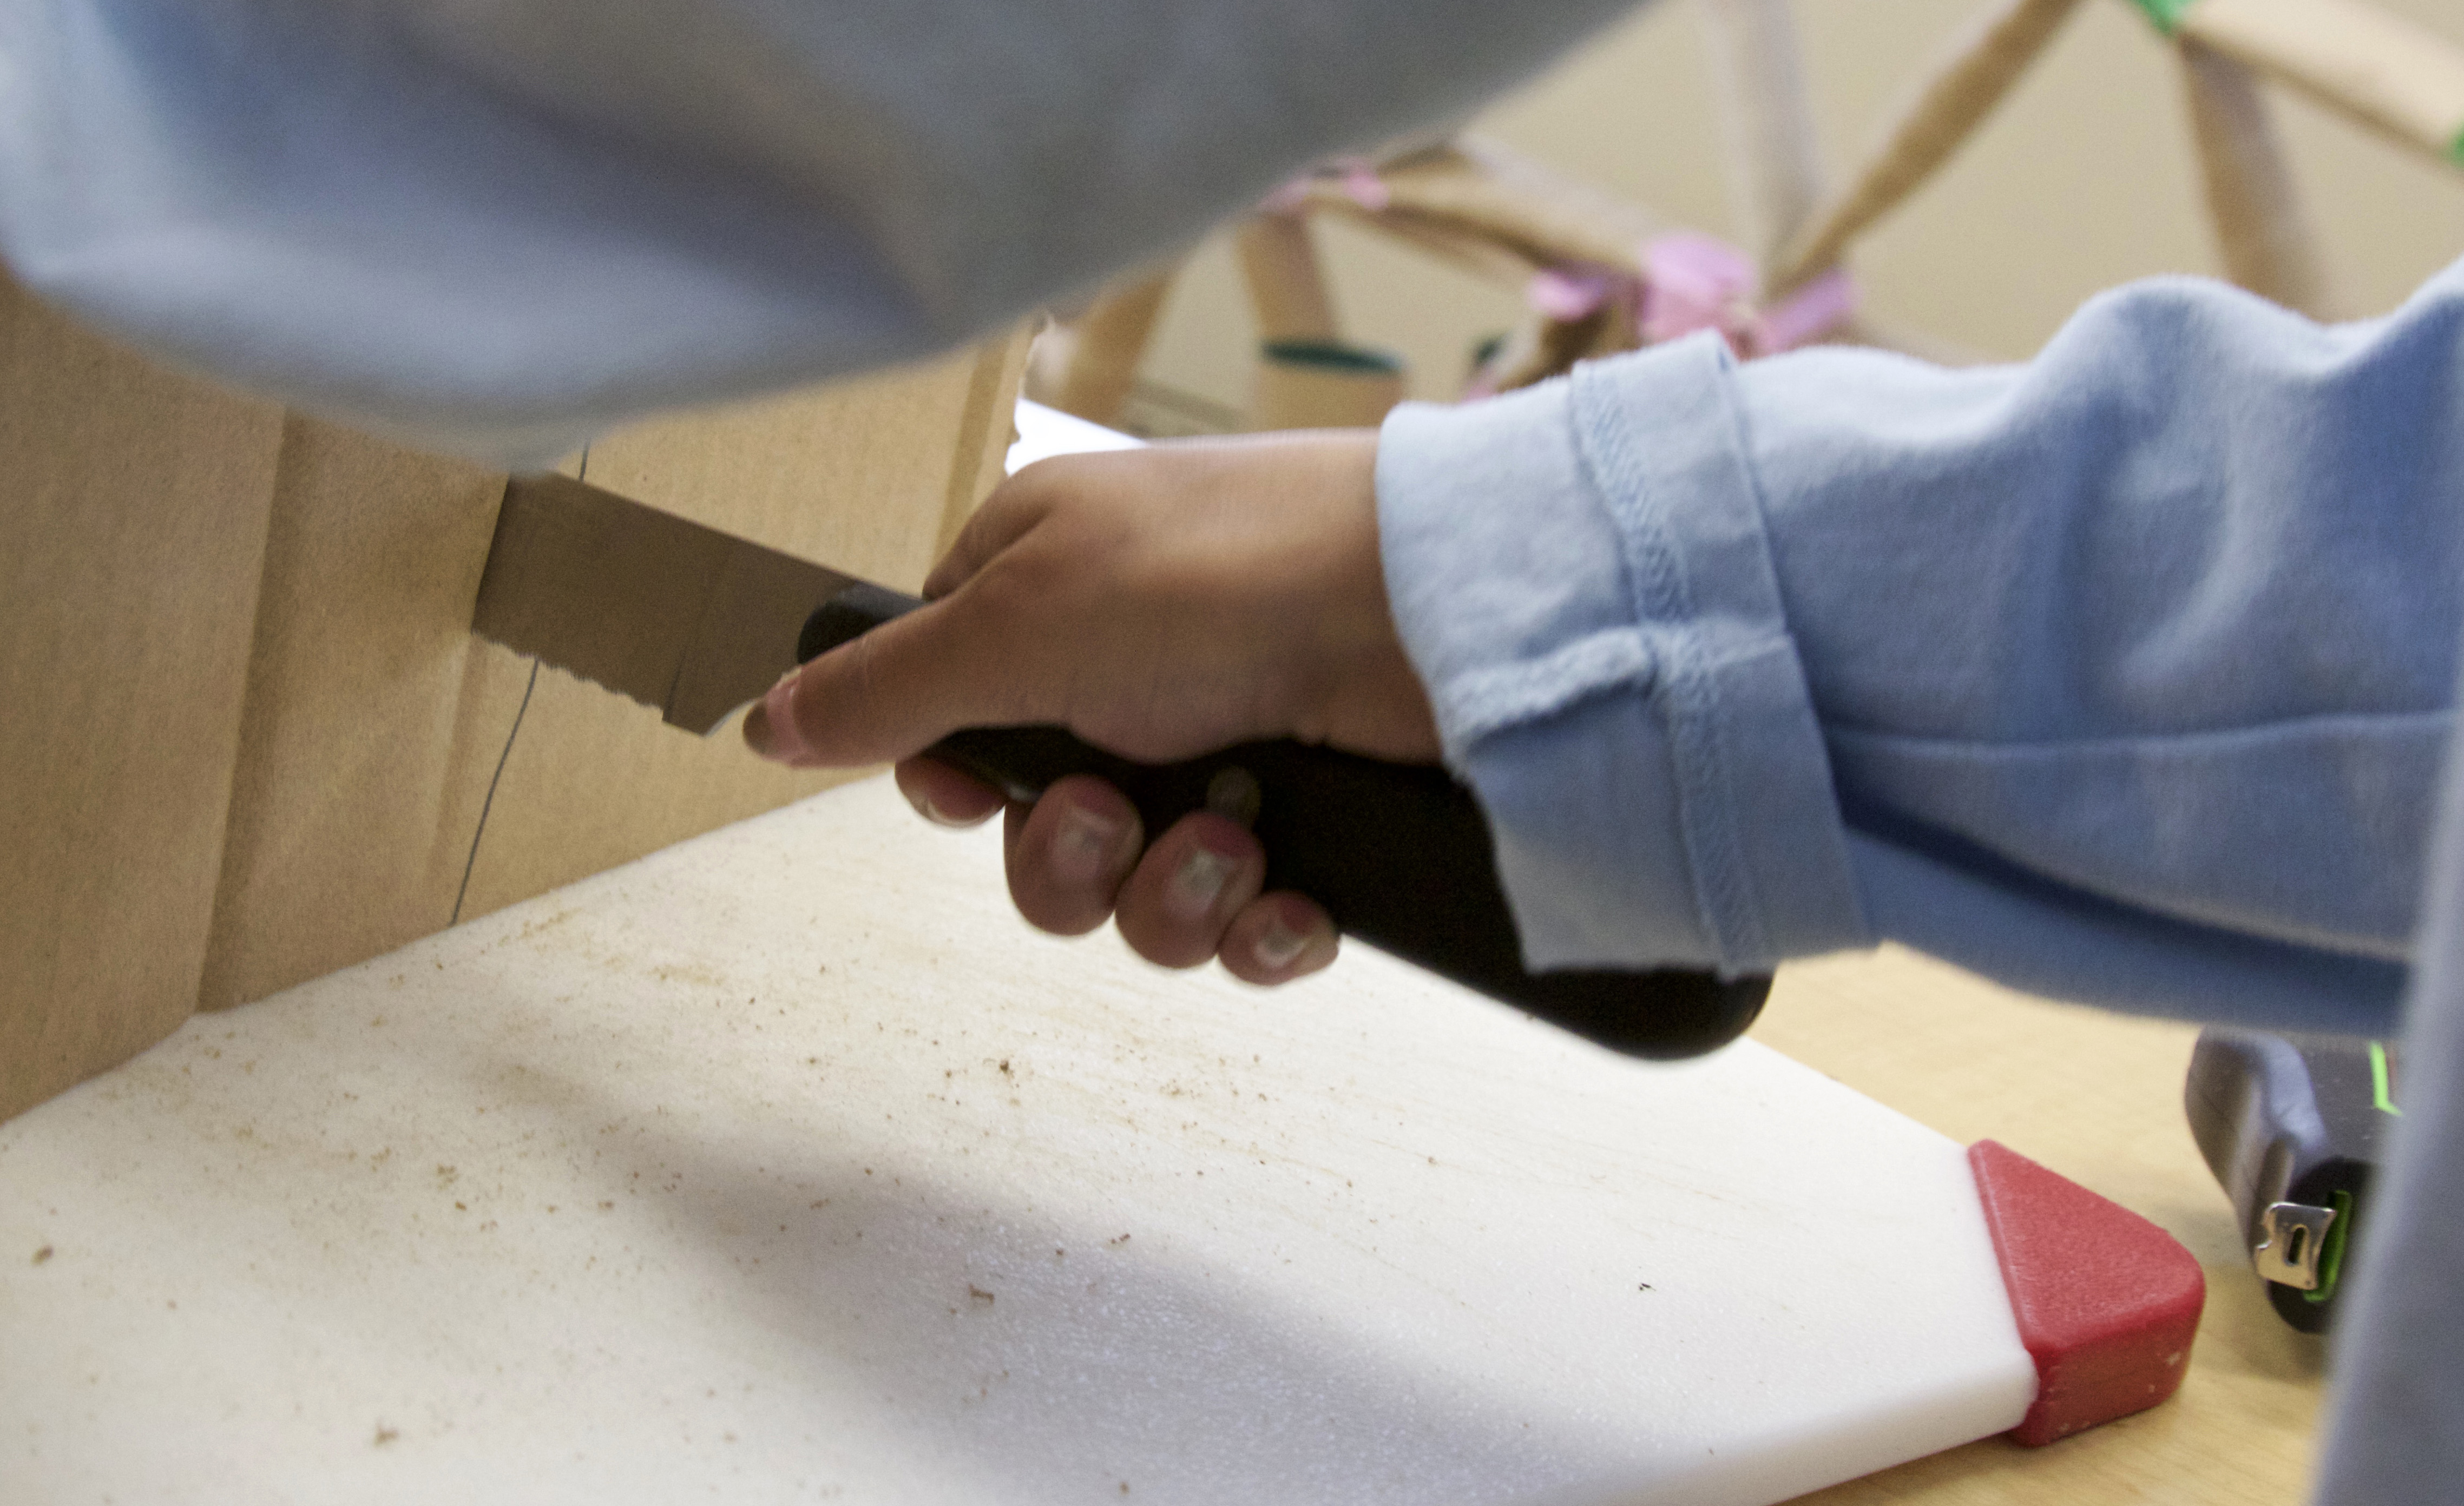
I’m always thinking of tools I can bring in to the Makerspace for my students to experience, and learn to use. I’ve brought bread knives to use as saws (always using clear and easy to remember rules, and always supervised by an adult), carpenter pencils and pencil sharpeners, tri-squares, mechanical rulers, mechanical tape measures, and levels.

This spring, as we began our supermarket build, I decided to enrich our world with nuts, bolts, machine screws, adjustable wrenches, phillips head screwdrivers and square head screwdrivers. When my students entered the Makerspace and noticed the new things sorted into our maker-trolly, they immediately began experimenting, asking questions, and sharing thoughts.

20180403_161737-01

Not all of them knew what the wrench was, or how to use it. I quickly swore those who knew how to use the wrench, to strict secrecy. I told them they had to keep it a secret for one week. If by Friday, the others hadn’t figured it out, they could teach them. But, until then, they had to let the others use their big beautiful brains and experimentation to discover it on their own. Many figured it out, and any that didn’t were happily taught by those in the know.

They loved using the tools and the hardware. Sometimes they would put the bolts/screws, washers, and nuts together using their fingers as the tools, at other times, they used the wrenches and screwdrivers. Our first foray into using them in the build was when they realized they could plunge the bolts/screws into the foam shelf they had created.

foam shelf

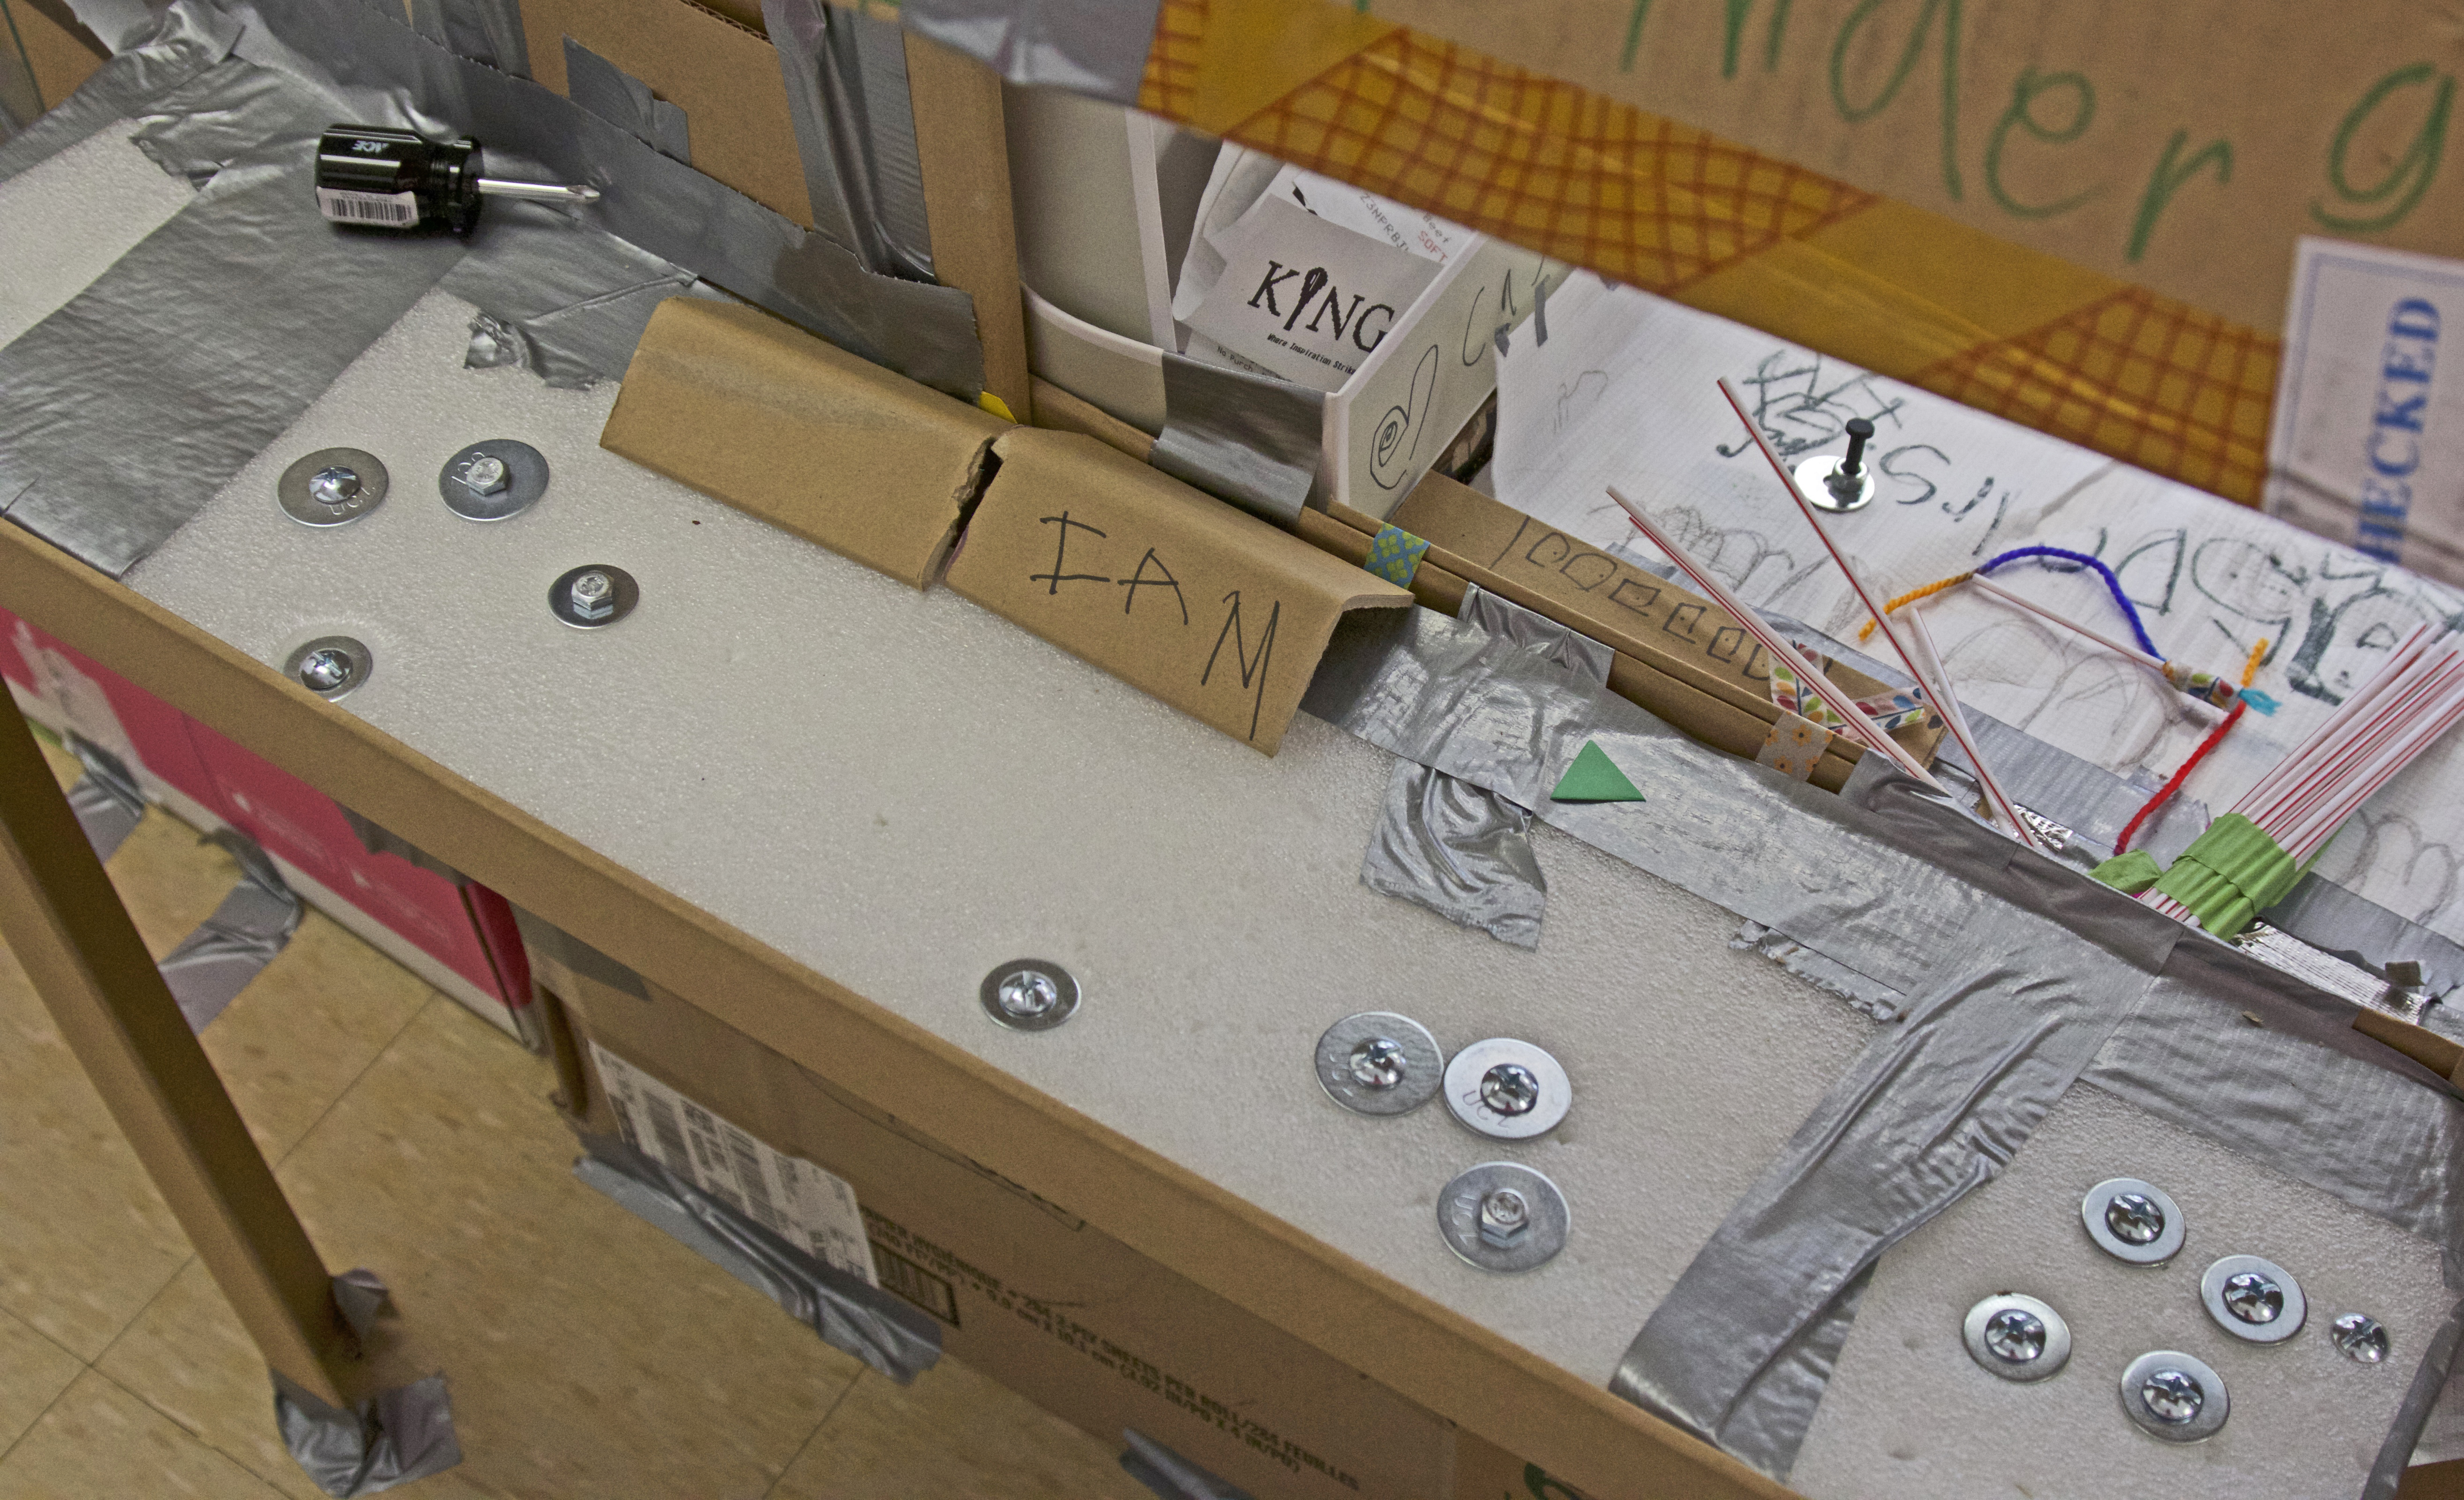
This required me to help them because the foam as actually a bit too thick for the size bolts/screws I had purchased. Cognizant of how impossible it was for them to succeed at this task on their own, I began thinking of specific projects that didn’t require so much help from me.

I came up with two.

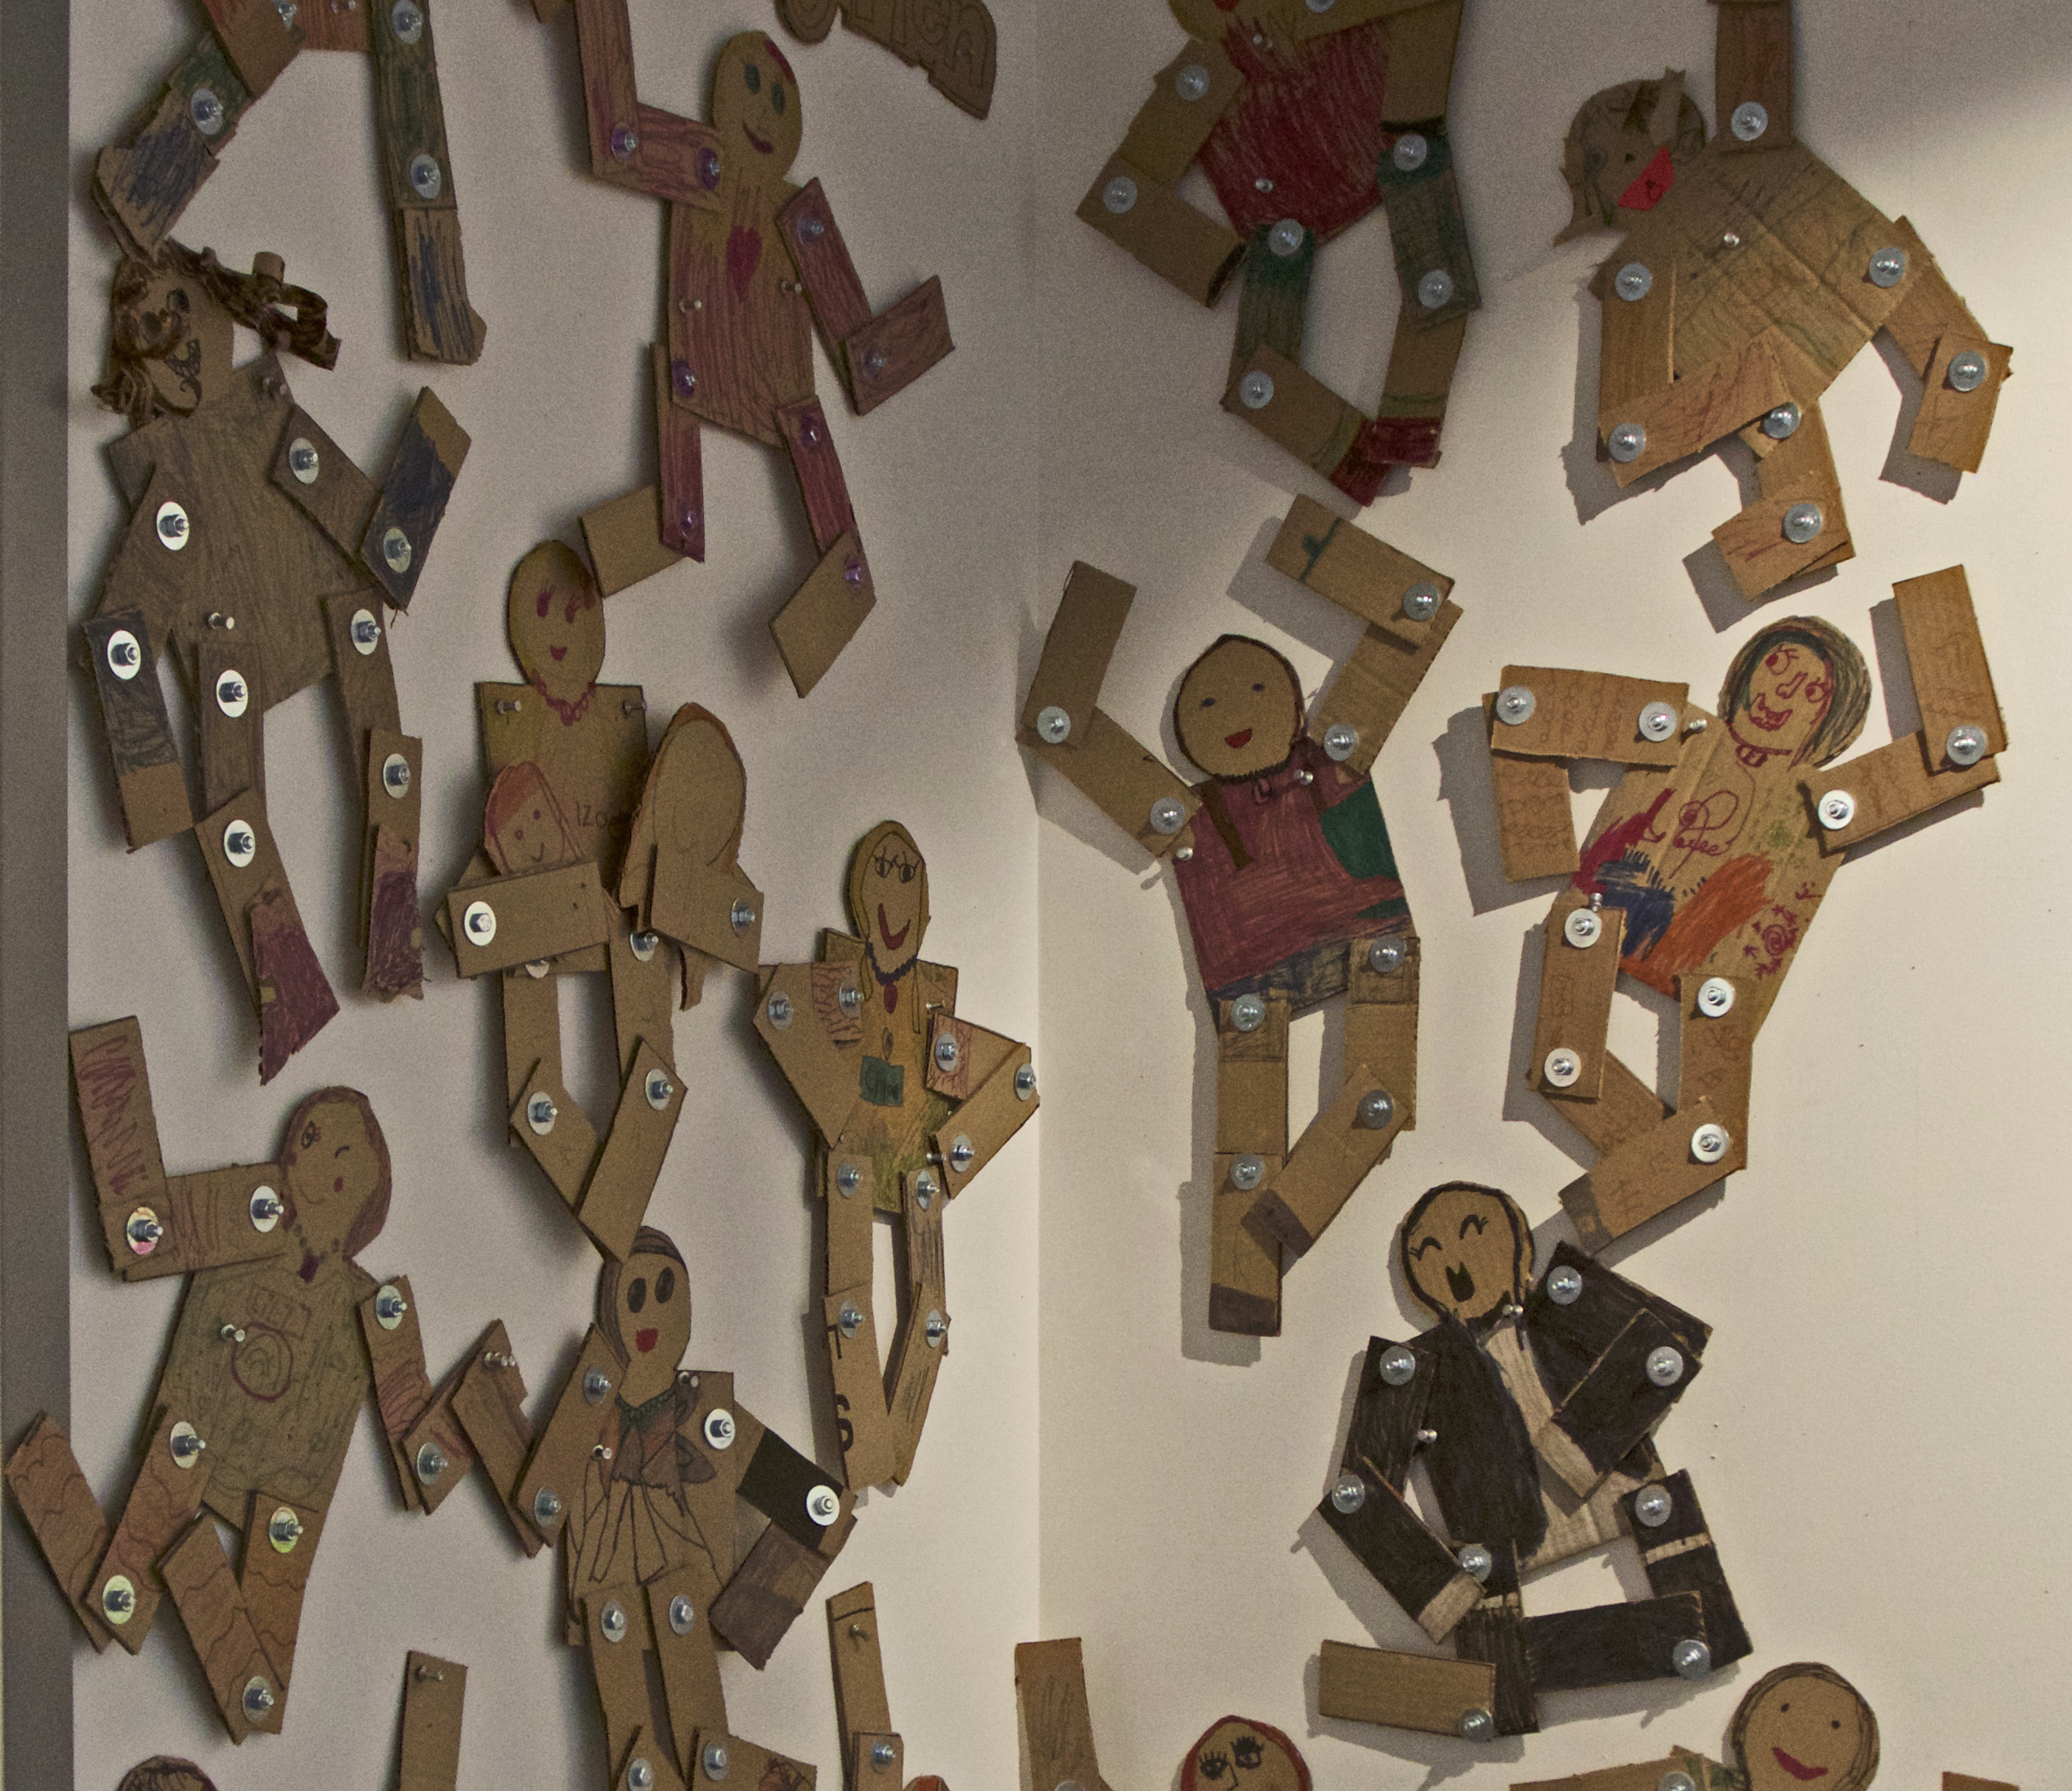
The first  was an art project. I thought creating people with articulated arms and legs would be a fun way for them to learn about the nuts, bolts, and washers. It required a good bit of thinking, risking, imagining and creating as well as significant manual dexterity and work.

20180418_193737-01

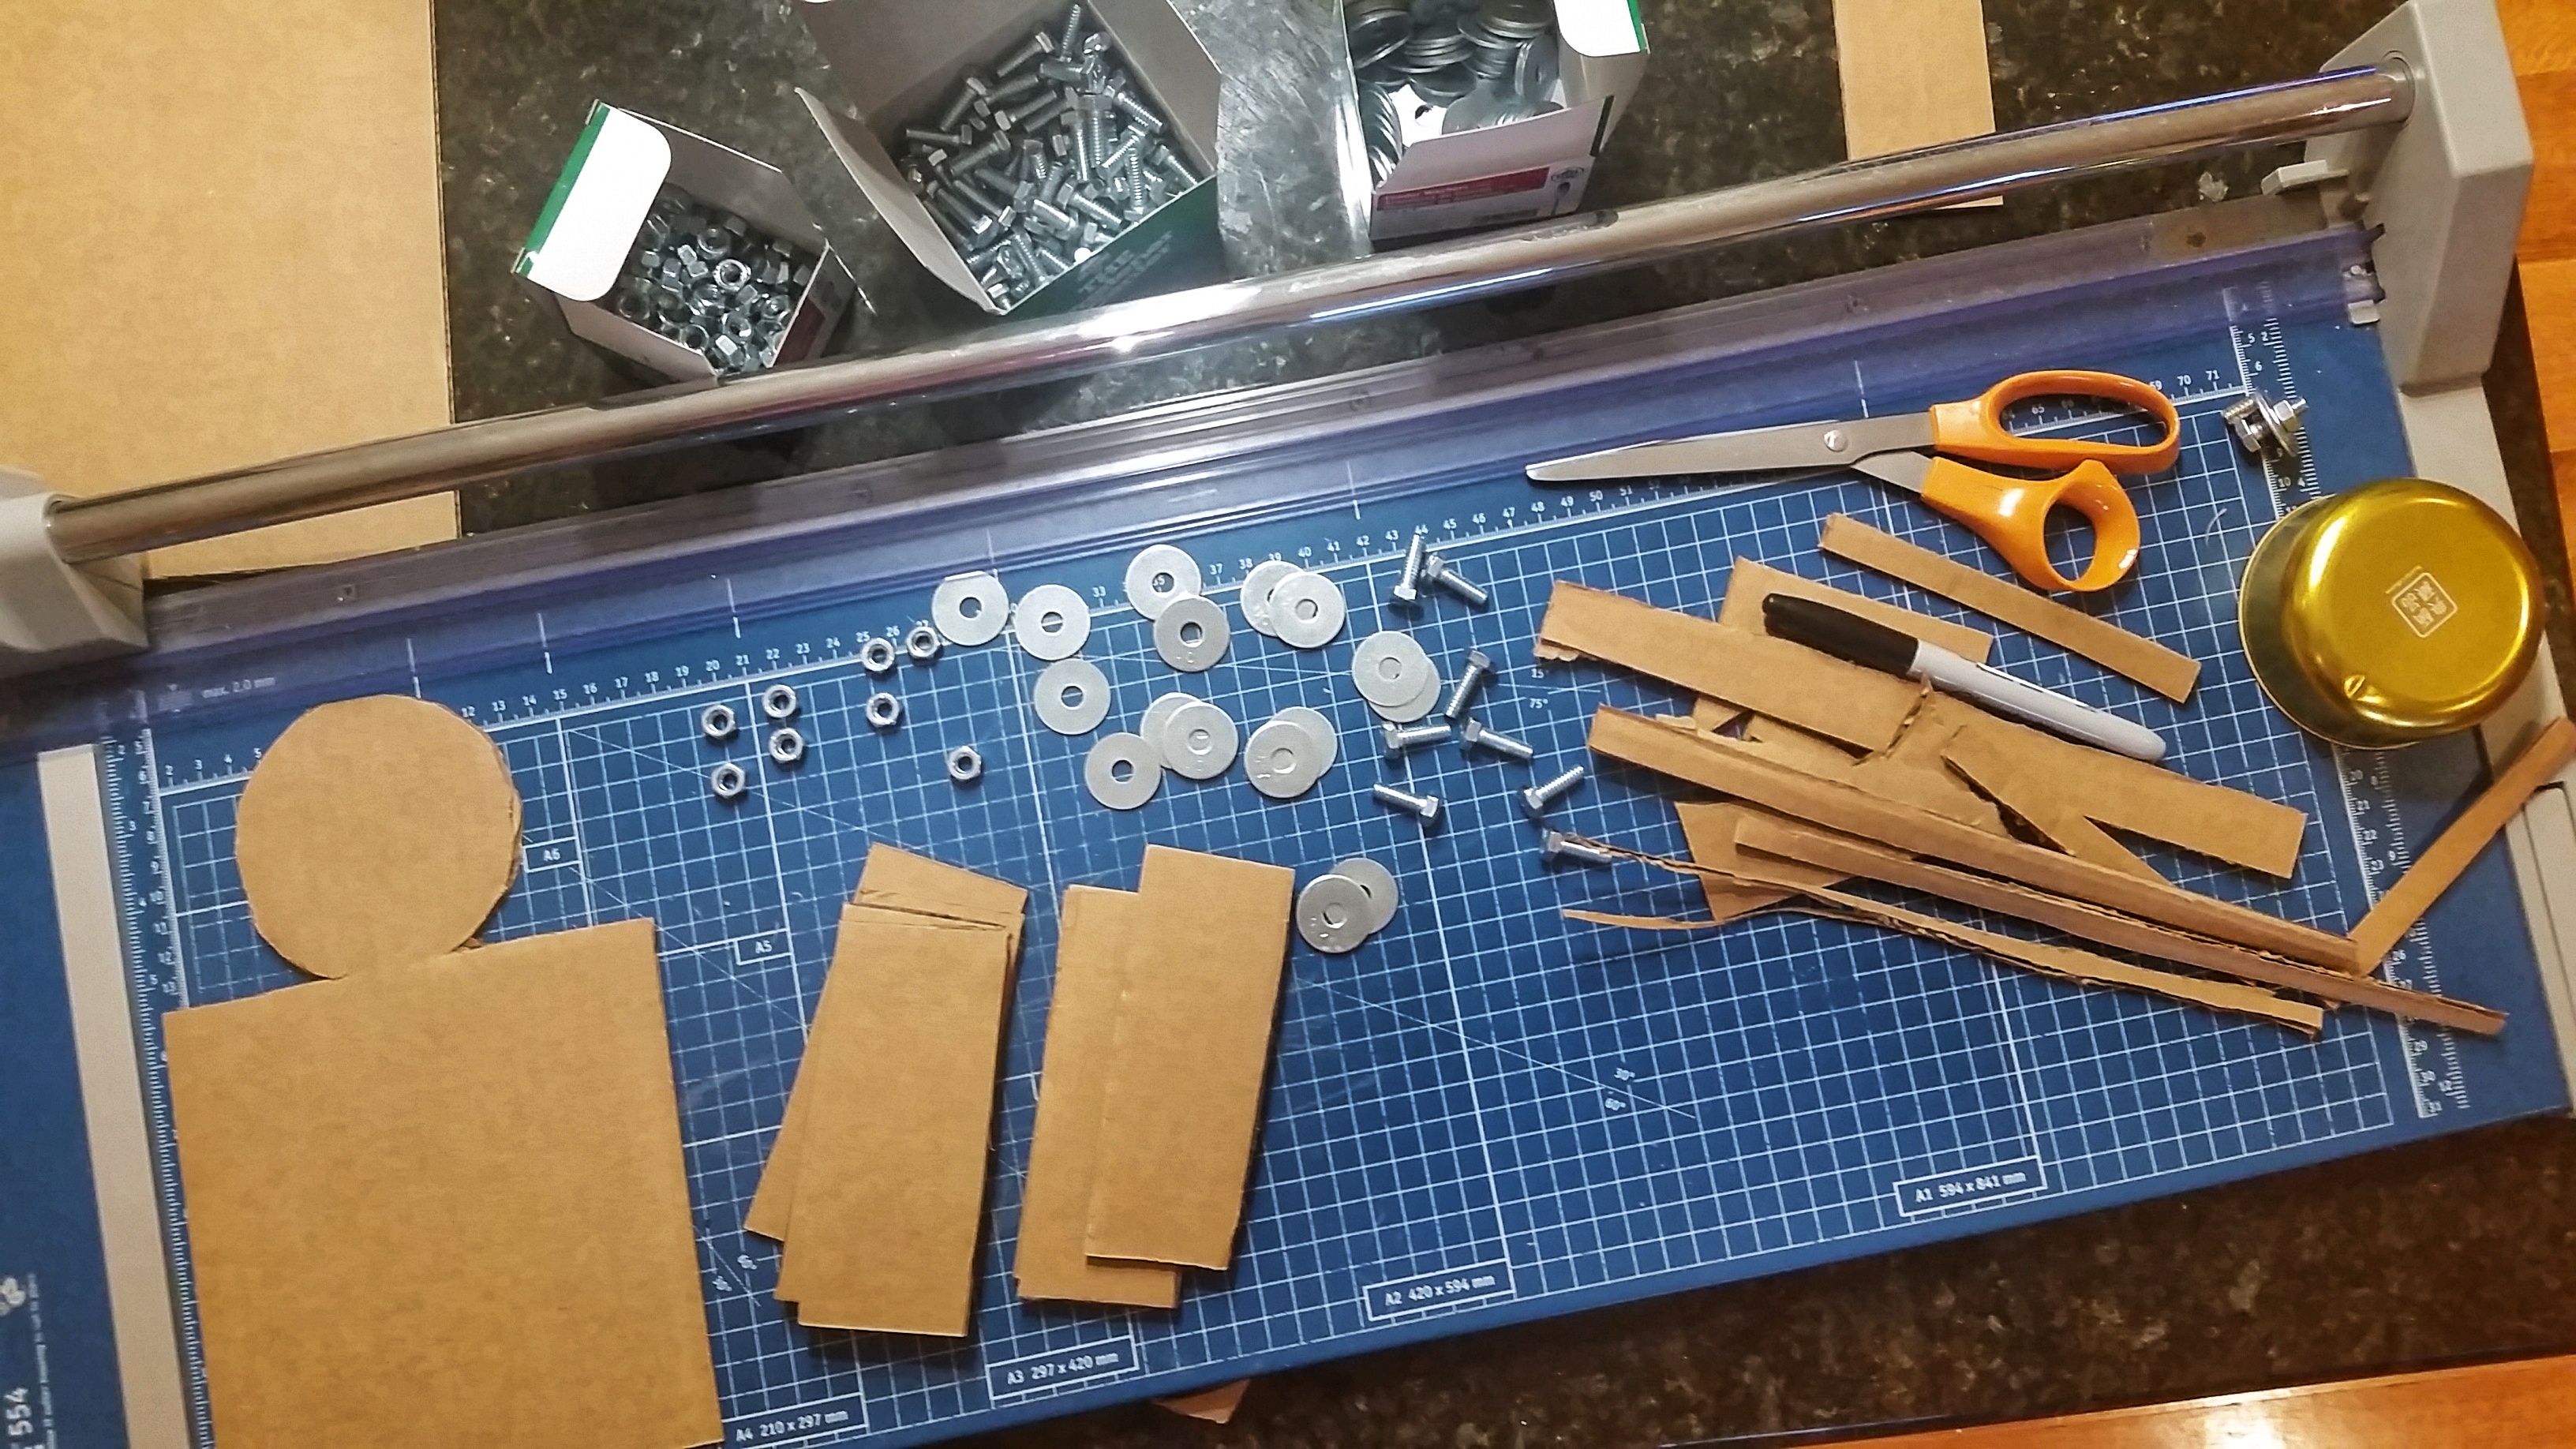
We talked a bit about how to use the hardware, and what was possible because of it — movement, and tightening the arms and legs into particular positions. We also discussed the possible pitfalls — poking yourself with the pencil that you used to make a hole for the bolt, making the hole too close to the edge thereby ripping the cardboard piece, and putting the bolt on backwards which would make hanging it darn near impossible because it was too far from the wall.

They were fantabulous workers, thinkers and creators! They were careful about positioning their holes, and making them. They persisted — counting out their hardware, changing bolts if they put them on backwards, and taking the time needed to accomplish their personal visions for their people.

20180419_131350-01

And gosh, did they imagine and create! Mothers with babies, a girl in a tuxedo, Draco Malfoy, girls with 3-D curly hair, a baby sucking a binky, and designer boots are just a bit of what they did.

Here are some of their people hanging in our art gallery:
 cropped dolls

The second project was creating sturdy shelves for the supermarket. By now they were pros at using the tools and hardware. With intensity and proficiency, they worked together to secure the shelves to the boxes. One climbed inside to install the washer, and tighten the nut. Another worked from the outside, holding the bolt in place to allow it to be tightened.

shelves

Meanwhile, the girls developed their own use for the tools and their skills. I loved all they thought of doing.

As they played with the hardware, they discovered many interesting configurations outside the normal purview of nuts and bolts. One presented me with this:

20180522_070340-01

Me: “Thanks! What is it? How do I use it?”

Student “Well, it could be jewelry … (significant thought) … or it could just be a fun              rolling toy!”

Me: “Indeed it could! I love it.”

Finally as they progressed even further in their comfort with the tools and hardware — and their belief in themselves as capable of doing anything necessary with them —  they enlarged their scope of projects. Seeing me unboxing two new sensory tables, one of my girls noticed the bolts, nuts and washers.

Student: “What’s that, Miss James?”

Me: “New sensory tables.”

Student: “What are you doing with them?”

Me: “I’m going to put them together.”

Student: “I can help!”

I love that she declared her ability to help. She didn’t ask! She knew I would accept help, so she just jumped in as my furniture building colleague! It was awesome!

I am particularly fond of this photograph as it captures the truth of the moment. The tip of the sneaker in the left hand corner is mine. I like that it indicates my presence, but the hands holding the tools are the hands of a 6 year old girl! That is one empowered girl!!!

20180430_143905-01

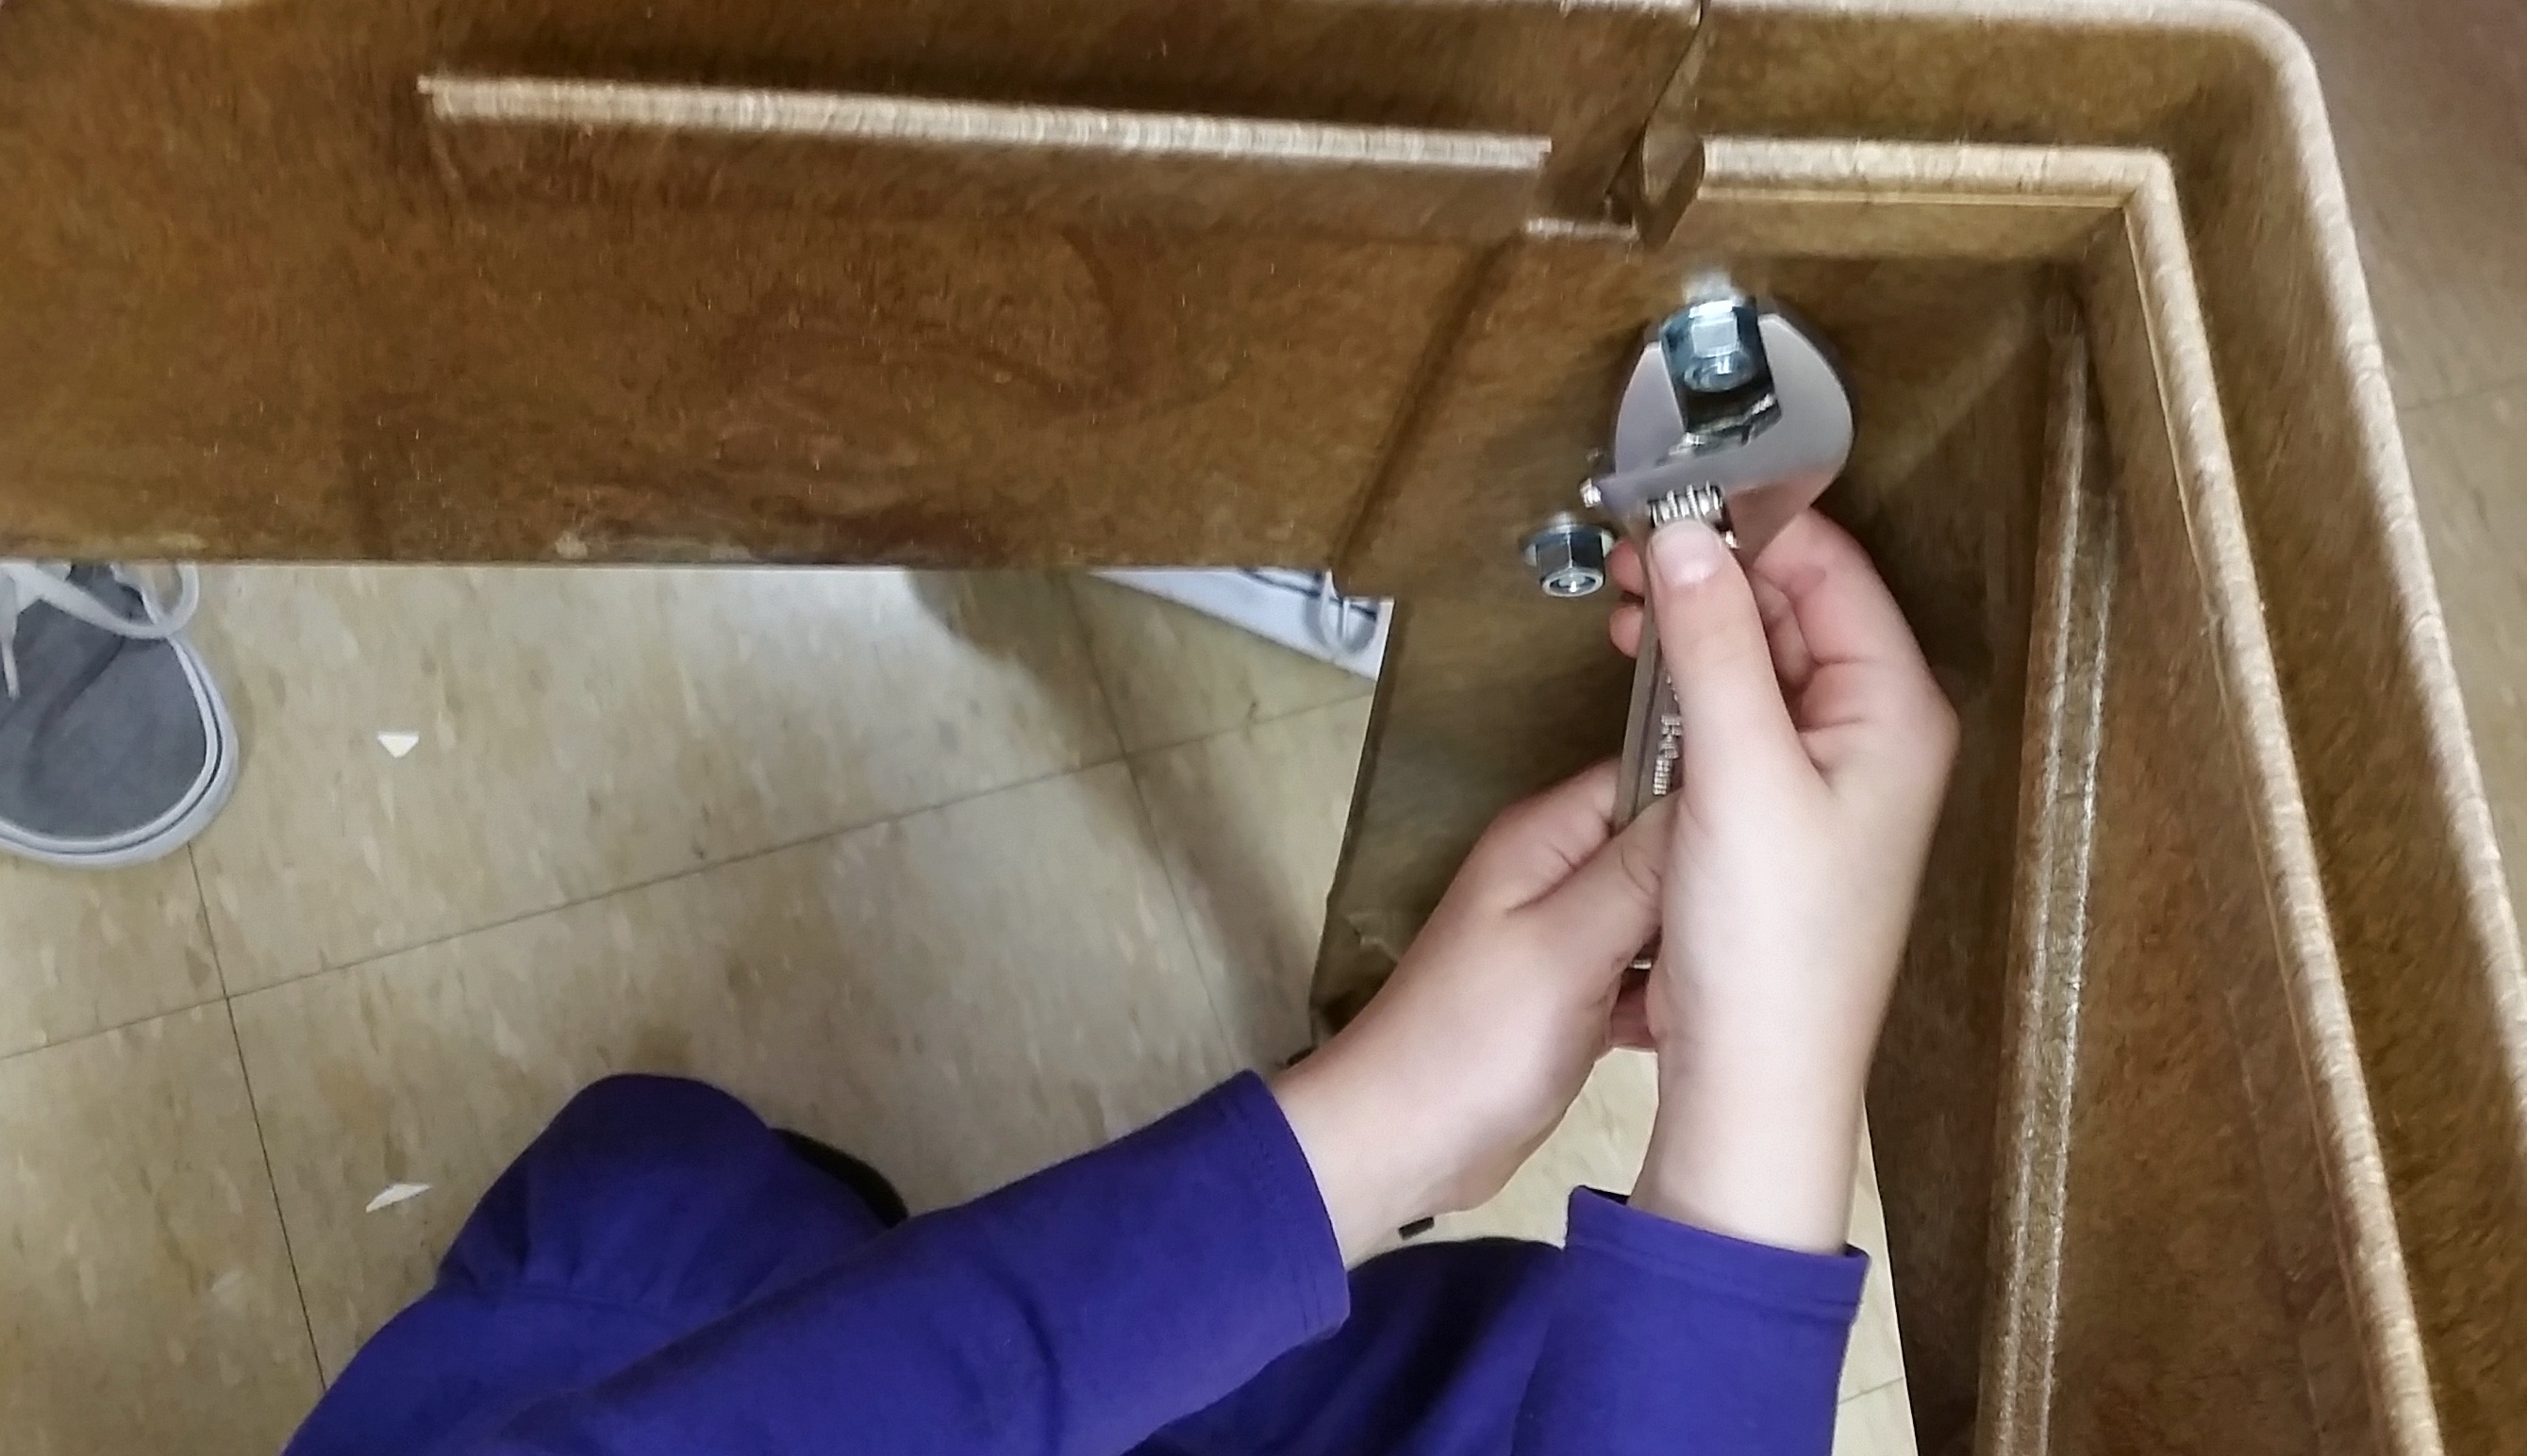
“Rock on with your fantabulous self, my girl. Rock on!”

Helping Students Reach Higher

As educators we often talk about wanting our students to:

  • reach
  • stretch
  • go as far as they can
  • achieve

We also work hard to provide:

  • instructions
  • help
  • scaffolding
  • tools
  • structure

My classroom word wall is quite fluid. Sometimes it has our names on it, other times it has words we may encounter in our various learning units. Once we return from winter break, and move towards spring break, I begin to give the world wall more and more to my students.

In reading they each write three words they want to add to our word wall. They must be words they know how to spell like they are written in a library book.

I’m careful to not say “Three words you know how to spell correctly.” When they use inventive spelling — which is appropriate and important in Kindergarten — the words they write are correct if they, and I, can read them. For instance eat might be written ete. Or, teacher might be encoded as teechr. These are examples of correct inventive spelling, because they follow phonetic rules, and accurately convey the sounds, words, and thoughts of the writer. I don’t want them to begin thinking that the way they write is incorrect, and only by memorizing words, or asking for help, are they able to spell, write, and share their ideas.

In Social Studies, my students think of three words related to our topic, that they’d like to add to our word wall. Often these are words that are difficult to spell like they are spelled in library books. My girls stretch them out as best they can, then we work together to make any needed changes. This gives me the opportunity to share rules, digraphs, blends, and crazy things about the English language (for instance, ir, ur, and er have the same sound!), as well as help my girls find their own errors in thinking, hearing and sounding out.

For instance, one girl wanted to write strong. She srog. We stretched the word out, tapping the sounds – to try and tease out that n sound. She added it. Then I asked her to read me her word again. She read strong. “Hmmm,” I said, “I read srong.” She looked at me with a puzzled look, and sounded it out while holding my gaze. Then she looked at what she wrote and sounded it out again. Finally, she laughed and said “Oh, t! I forgot a t.”

These moments are examples of my students reaching, stretching, and attaining, while I support and scaffold. Sometimes, though, the reaching, stretching, and scaffolding is much more literal.

My students are confident in their own ability to find safe and effective ways to use things in our classroom to achieve their goals. So, they often create their own scaffold, and reach as high as they desire.

IMG_20180210_075908_processed

But, there are times the height they hope to attain is beyond their reach. That’s when I offer myself as a resource. I provide the scaffold they need to reach higher than they might on their own.

IMG_20180210_075948_processed

I really like that I am supporting them, rather than holding them. They get the chair. They have to be brave enough to step onto the scaffolding (me) and stand tall. Even though I am spotting them all the while it’s not always easy! Once on the scaffold, they have to breathe, trust, focus, reach higher. and write — undeterred by the distance they are from the floor!

For me, these are all moments of creativity.

  • Thinking outside the box.
  • Being open to possibility.
  • Inventing as we spell.
  • Not being deterred by what seems impossible considering the tools we have or do not have.
  • Risking.
  • Being brave.
  • Giving it a go.
  • Reflecting, adapting and rethinking.

And, let us not forget the equally important and essential parts of engaging in creative thinking and doing:

  • Experiencing joy.
  • Being struck by beauty and awesomeness.
  • Learning.

Classroom Setup 2017-18

Merriam-Webster’s sixth definition of setup is “the manner in which the elements or components of a machine, apparatus, or system are arranged, designed, or assembled.”

I love to remind myself of this definition while I’m going about my classroom setup. I am designing a system in which I, and my students, colleagues, and parents, will work, create, play, and learn. If I’m any example, creating a classroom system requires a lot of thought, reflection, iteration, sweat, and muscle!

As I worked, thought, and sweated, I reminded myself of the truth about myself and my students. We are “rich in potential, strong, powerful, competent(Loris Malaguzzi quoted in The Hundred Languages of Children, 2nd addition, p. 275). I also thought back to my MA research where I considered the environment that might best support creativity and academic excellence.

I read so many thought provoking things as I researched for my MA. I synthesized them in an article in Creative Education.  If I were writing my dissertation, or the article now, I think I might title it Managing the Classroom for Creative and Cognitive Excellence. I want my classroom setup to support creative excellence, and cognitive excellence. To do that, it has to include and support the 6 elements of Teresa Amabile’s KEYS I adapted for classroom management in Managing the Classroom for Creativity:

  • Freedom which enables and and encourages ownership, motivation, and engagement of all the learners.
  • Positive challenge which helps everyone know the tasks/skills they engage in are important and valuable.
  • Supervisory Encouragement which values work and thought, and encourages inquiry and exploration.
  • Work group support which encourages the generation and exchange of new ideas.
  • Easy access to sufficient resources.
  • Organizational Support of our shared vision and an infrastructure that enables and empowers everyone in my learning space.

I’ve finished my initial classroom set up, and am super happy with the result. There is more work to be done, but I’m ready for my learners to join me in the space.

In addition to including the 6 elements listed above, I worked on including more visibility this year. I was mindful of balancing beauty and utility. I wanted our work, vision, thought, prototypes, iterations and our creative and cognitive “mess” to be visible. It adds a richness to the space — telling our story while increasing curiosity, inquiry, wonder, learning, understanding, creativity and excellence!


Here are a few photos with my reflections.

Last year our maker projects where stored in a classroom cabinet. This year, some awesome maintenance people ripped out the cabinet, and I replaced it with this open shelving unit. The wall behind and beside it is covered with a large art piece my students made last year. (How awesome is that?!!!) The use of that artwork, the trays for student work, and the words on the front of the shelving unit let everyone know these things are valued and supported.

20170901_133455


A second smaller shelving unit — on the coolest, gigantic wheels — keeps our tools neat and easily accessible. There’s opportunity for remarkable exploration and learning through the use of these tools.

20170901_133646


The maker trolley has always been a part of the makerspace, but this year I am repurposing the back to hold more materials, and storing our large item bins in the open. I am hopeful this will increase use and understanding.

20170901_133817


The two classroom easels provide opportunities for creative art experiences outside the regular art curriculum. The second is actually a double easel – fabulous for conversation and inspiration! I love leaving the dried paint on the easels. It adds an element of beauty and history to the space, and allows for freedom as one paints.

I’m thinking about the resources I have that might enable me to store paper beneath the easels — enabling the artists to be autonomous in their work. I have some ideas I’m going to try this week.

20170901_133829

I love the connection between my learners’ art experience and mine (the watercolors are my work). I also like the suggestion of a connection between painting, shapes, blocks and building.

20170901_133525


Print is plentiful and purposeful in my learning space. I want my students to read the room and learn. I want them to become more skilled at letter recognition and use, and to be inspired — to see, read, absorb, and live, what is important.

20170901_13440420170901_13374120170901_133705


I love all the little print treasures in my space, so it’s nearly impossible to choose a favorite. However, I am enjoying this one quite a bit!  I wonder what it will evoke or awaken in those who see it. For me it stirs up joy, possibility, positivity, and continuing even when obstacles arise.

20170901_133536


And this, partially hidden gem, out of the way of traffic, is a message from me, to me. “Be a superhero every day. The kids and the world deserve it!”

20170901_134151


All the best to all my fellow educators. Arm yourself with another Malaguzzi truth “Nothing without joy!” and have a fantabulous year!


NOTE:

Whenever I write, I think of all the remarkable people I’ve read, talked with, and researched . I think about adding tons of links to each post. Instead, I offer my deep gratitude to all those who informed my research and learning,  and remind my readers there is a great bibliography at the end of my Creative Education article.


Save

Sometimes a bread knife …

Sometimes a bread knife:

20170629_082831

Sometimes a saw:

IMG_7324

“Creativity involves coming up with ideas that work.” (Teaching for Creativity p. 14)

Sometimes the creativity arises from necessity. This was the case in my kindergarten class. I needed a way for me and my students, to cut, or saw, cardboard pieces and tubes. It had to be safe and easy to use.

Necessity, and creative thinking, yielded a super useful girl-powered tool. It just required me to look at things, think about them, and use them in a new way! With a little creative thinking, a common kitchen tool become something much more.

As they used the “bread-knife-saw” the following conversation ensued:

Students: “Oh come on, Miss James, this isn’t really a bread knife!!!!”

Me: “Yes it is! I cut my bread with it at home.”

Students: *silently stare me with looks of incredulity, amazement and delight*

If this were a graphic novel, or cartoon, the next frame would have shown the students heads exploding from this mind blowing experience and conversation!

I love when creativity evokes joy, wonder, even disequilibrium or disbelief. These feelings help to cement the moment  in our brains and hearts. Hopefully, these feelings and moments increase our future awe, fascination, and creative thinking.


Resources:

Beghetto, R., Kaufman, J. C., Baer, J., (2015). Teaching for Creativity in the Common Core Classroom. New York, NY: Teachers College Press,